Do It Yourself Ring Light

A do it yourself ring light can be a smart, budget-friendly way to improve video calls and casual content if you choose stable, dimmable parts. For frequent use or the most polished result, a finished ring light is usually the easier and more reliable option.
do it yourself ring light projects can be a smart way to get softer front-facing light without committing to a pricier studio setup. For Hurrell Editions readers, the real question is not whether a DIY version can work, but whether it will suit your space, your safety needs, and the look you want on camera.
- Best fit: Works well for desks, vanity areas, dorms, and small filming corners.
- Top priorities: Brightness, dimming, color temperature, and stable mounting matter most.
- Power choice: Plug-in is most dependable; USB and battery trade convenience for flexibility.
- Main risk: Poor wiring, weak stands, and bad diffusion can make the setup unsafe or unattractive.
- Best verdict: DIY is great for customization and value, but commercial lights win on consistency.
Do It Yourself Ring Light: What It Is and Whether It’s Worth Making
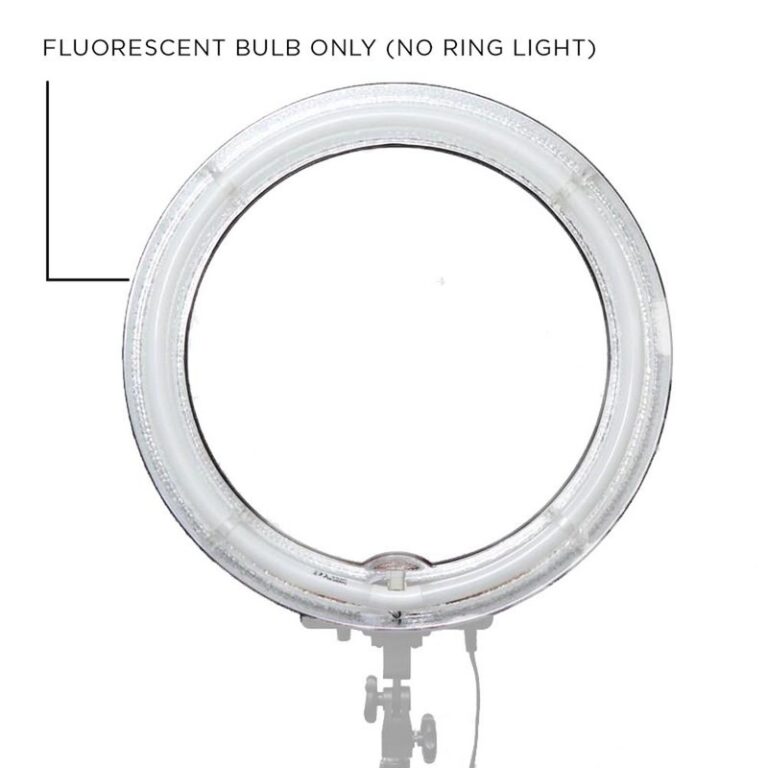
A do-it-yourself ring light is any circular or circular-ish lighting setup built from readily available parts rather than purchased as a finished unit. That might mean an LED strip mounted to a ring-shaped frame, a clip-on light paired with a diffuser, or a repurposed circular fixture adapted for video calls and content creation.
It is worth making when you want softer face lighting, a custom size, or a lower-cost solution for casual use. It is less compelling if you need highly consistent output, a polished finish, or a setup you can trust every day without adjustment.
Quick answer: the simplest DIY ring light setup for creators, home offices, and casual video calls
The simplest practical version is a small ring-shaped LED setup on a stable stand with a diffuser and adjustable brightness. For most people, the best DIY approach is the one that gives even light, stays secure, and plugs into a reliable power source without complicated wiring.
How a DIY ring light compares with store-bought ring lights in 2026
Store-bought ring lights usually win on convenience, consistency, and finish. They are built to be assembled quickly, and many include a stand, phone mount, and dimming controls in one package.
A DIY version can win on flexibility. You can choose the diameter, style, power source, and look to better fit a desk, vanity, or small filming corner. But because the parts vary, the final result depends on how carefully the components are matched.
- Can be tailored to your room size and lighting needs
- May cost less if you already own some parts
- Can be styled to blend into your decor
- Less predictable light quality than a finished product
- May require more setup, testing, and adjustment
- Safety and durability depend on the parts you choose
Who a Do It Yourself Ring Light Is Best For
This kind of setup is most useful for people who need decent front light more than they need professional production value. It makes sense when the goal is to look clearer on camera, reduce shadows, and improve visibility in a compact room.
Content creators, students, remote workers, and budget-conscious beginners
Content creators often want a ring light for face-centered videos, livestreams, tutorials, and product demos. Students and remote workers may simply want to look more polished on video calls, especially in rooms with weak overhead lighting.
Budget-conscious beginners are another strong fit, especially if they are still figuring out whether they need a permanent lighting setup. If you are experimenting, a DIY version can be a practical bridge before upgrading to a more refined model.
If your work depends on accurate color, repeatable brightness, or frequent moving between rooms, a finished ring light may be the safer long-term choice. DIY builds vary too much to guarantee the same result from one setup to the next.
Which rooms and setups it fits best: desks, vanity areas, dorms, and small studios
DIY ring lights tend to work best in compact spaces where a full lighting kit would feel oversized. Desks, vanity areas, dorm rooms, and small studio corners are the most natural fits because the light can stay close to the subject and occupy very little floor space.
If the room is shared or multipurpose, a DIY setup can also be easier to stow away than a larger professional rig. For inspiration on compact lighting choices, readers may also find best gallery picture light for small spaces useful when thinking about how light behaves in tight interiors.
What to Look for Before Building or Buying Parts
Before you gather parts, decide what the light needs to do. A setup for video calls does not need the same output or durability as one meant for frequent short-form filming.
Brightness, color temperature, and dimming control
Brightness should be enough to brighten your face without washing out features or creating harsh reflections. Dimming control matters because the ideal setting changes with room light, time of day, and camera exposure.
Color temperature is equally important. A cooler light can look clean and crisp for office use, while a warmer setting may feel softer and more flattering for vanity or lifestyle content. If the product or parts listing does not clearly state the temperature range, confirm it before buying.
If you want one setup for both work and casual filming, choose adjustable brightness first and adjustable color temperature second. That combination gives you the most flexibility across different rooms and tasks.
Power source options: USB, battery, and plug-in setups
USB-powered setups are convenient for desks and laptops, but they may be limited in output depending on the parts used. Battery-powered versions are more portable, though you will need to think about runtime and charging habits.
Plug-in setups are usually the most dependable for longer sessions. They are often the best option for a fixed home office or vanity because you do not need to worry about the light fading during use.
For readers comparing rechargeable options, how long it takes to charge a picture light is a useful reference point for thinking about charging expectations in compact lighting products.
Materials and specs that affect stability, safety, and light quality
The frame or mount should feel rigid enough to hold the light without wobbling. Lightweight is helpful, but too little structure can lead to tilting, sagging, or repeated readjustment.
Diffusion materials affect how soft the light looks. A proper diffuser can reduce hotspots and make the ring effect less obvious on skin and reflective surfaces. Cable quality, switch placement, and base stability also matter because they affect daily use more than most people expect.
- Choose a brightness range that fits your room, not just your camera
- Confirm power source, dimming, and color temperature details
- Check that the stand, clip, or base is stable enough for the setup
- Make sure diffusers and cables are designed for the heat and voltage involved
How to Size and Place a DIY Ring Light for the Best Results
Size and placement determine whether the light flatters your face or simply fills the room with glare. Even a good light can feel disappointing if it is too small, too far away, or aimed at the wrong angle.
Choosing the right diameter for faces, products, or tabletop use
Smaller ring lights are often better for tabletop work, compact desks, and quick calls because they are easier to position and store. Larger diameters can create a softer look for faces and products, but they also take up more space and may need a sturdier stand.
If your main goal is filming hands, crafts, or small objects, a medium-sized setup is often easier to balance than an oversized one. For face-centered content, the light should be large enough to wrap softly around features rather than acting like a bright point source.
Placement height, angle, and distance for flattering, even lighting
The most flattering placement is usually slightly above eye level and angled downward just enough to reduce under-eye shadows. Too low, and the light can look unnatural; too high, and it may create deep shadow under the eyes and nose.
Distance also matters. Closer placement generally gives a softer, more flattering look if the diffusion is good, while farther placement can increase shadow and reduce the ring light effect. The best distance depends on the light’s output, the room brightness, and your camera framing.
Ring lights became especially popular in beauty and social video because the circular source helps reduce directional shadows and can create a catchlight in the eyes.
Room-specific positioning for desks, mirrors, and filming corners
At a desk, place the light just above your monitor line so it brightens your face without shining directly into your eyes. Near a mirror or vanity, try to keep the light centered so it does not create uneven reflections across the glass.
In a filming corner, give yourself enough space to adjust the stand and camera angle separately. That makes it easier to avoid awkward shadows from shelves, curtains, or nearby furniture.
If you are building a broader content corner, the same placement logic used in what is a dimmable picture wall light can help you think about controlled brightness in a small interior.
Style Ideas and Setup Tips for a Cleaner Look
A DIY ring light does not have to look improvised. With the right stand, cable routing, and finish choices, it can feel like a deliberate part of the room rather than a temporary fix.
Matching the light to modern, minimalist, or creator-focused decor
Minimalist rooms usually look best with simple finishes, clean lines, and a limited color palette. Creator-focused rooms can handle a more technical look, especially if the light is part of a visible content setup.
If your room already includes metal accents, black hardware, or neutral surfaces, choose parts that echo those materials. That helps the light blend in instead of standing out as an afterthought.
Using stands, clips, mirrors, or backdrops without clutter
Choose the fewest accessories that still let the light work properly. A sturdy stand or clamp is often enough, and adding too many extras can make the setup feel crowded or unstable.
Mirrors and backdrops should support the lighting, not compete with it. Keep reflective surfaces under control so they do not bounce harsh glare back into the camera.
- Use one finish consistently across the stand, clip, and visible hardware
- Hide excess cable length with simple cord management rather than decorative clutter
- Keep the background visually quiet so the light becomes part of the scene, not the distraction
- Use a neutral backdrop if you want the light to read as intentional and polished
Ways to make a DIY setup look intentional rather than improvised
Consistency is what makes a DIY build feel designed. Matching materials, choosing a stable base, and avoiding visible mismatched parts will do more for the final look than adding decorative details.
It also helps to think of the light as one element in a larger composition. A clean chair, uncluttered desk, or neatly arranged vanity can make even a simple ring light setup feel more refined.
Benefits, Limitations, and Common DIY Mistakes
The appeal of DIY is flexibility, but the trade-off is that you are responsible for the quality of the final result. That means understanding where it saves money and where it can become frustrating.
Why DIY can save money and customize light output
DIY can save money when you already have a stand, clamp, or compatible light source. It also lets you shape the output more precisely, especially if you want a specific size, warmer tone, or more compact footprint than a standard product offers.
This is especially useful for people who only need the light occasionally. If you are not filming every day, paying for a full-featured commercial model may be more than you actually need.
Trade-offs versus commercial ring lights: consistency, durability, and finish
Commercial ring lights generally provide more predictable results because the components are designed to work together. They are also more likely to have a finished appearance, better packaging, and clearer support documentation.
DIY builds can be perfectly usable, but the light quality may shift depending on the bulb, diffuser, mount, and room conditions. Durability is another unknown unless you choose sturdy parts and assemble them carefully.
For readers weighing whether a finished product is worth it, are gallery picture lights worth it offers a helpful way to think about value, longevity, and convenience in a lighting purchase.
Frequent mistakes with wiring, diffusion, glare, and unstable mounting
One common mistake is focusing on the ring shape while ignoring the quality of the light source. A ring that looks good but throws harsh hotspots or uneven color will be disappointing on camera.
Another common issue is unstable mounting. If the light droops, tilts, or vibrates, it becomes distracting and may be unsafe. Wiring mistakes can be even more serious, so any electrical modification should stay within the limits of the parts and instructions you are using.
- Use a stable base, secure clamp, or properly rated stand
- Choose diffusion that softens hotspots without blocking too much light
- Confirm voltage, plug type, and cable condition before daily use
- Overloading a weak mount or relying on a wobbly tabletop base
- Using improvised wiring that is not clearly rated for the setup
- Placing the light so close that it creates glare on glasses or screens
Care, Maintenance, and Safety Basics
Good care keeps a DIY light usable longer and reduces the chance of avoidable problems. This matters even more when the build uses separate parts rather than a single sealed product.
Keeping LEDs, diffusers, and cables in good condition
Dust the diffuser and frame regularly so the light stays even and clean-looking. Check cables for kinks, fraying, or loose connections, and replace any part that no longer feels reliable.
If the setup uses adhesive clips or lightweight mounts, inspect them periodically because heat, humidity, and repeated adjustment can weaken them over time.
Heat management, electrical caution, and safe daily use
Even when LEDs run cooler than older bulbs, heat still matters around enclosed parts, adhesives, and plastic components. Give the light enough airflow and avoid covering it with materials that could trap heat.
Do not improvise electrical connections if you are unsure about the parts’ voltage, heat tolerance, or compatibility. If the build involves wall anchors, heavier fixtures, or any structural mounting, confirm wall type and weight limits, and use a qualified professional when needed.
For a safer routine, switch the light off when not in use, keep liquids away from the setup, and follow the manufacturer’s care instructions for any purchased components. If a part does not come with clear guidance, that is a sign to be cautious rather than creative.
Final Recommendation: Is a Do It Yourself Ring Light a Smart Choice in 2026?
For many readers, yes — but only if the goal is practical, not perfection. A do-it-yourself ring light is a smart choice when you want affordable, adjustable front lighting for calls, casual filming, or a small content corner and you are willing to choose parts carefully.
Best-value use cases, when to upgrade, and the clearest verdict for Hurrell Editions readers
The best value comes from simple setups in desks, dorms, vanities, and small studios where a clean, soft light matters more than a premium finish. If you need consistent output, frequent portability, or a polished all-in-one package, upgrading to a commercial ring light is usually the better move.
For Hurrell Editions readers, the clearest verdict is this: build one if you want flexibility and can keep the design stable, safe, and tidy; buy one if you want convenience and predictable results. The right choice is the one that fits your space and your actual lighting needs, not the most elaborate version you can assemble.
Frequently Asked Questions