How to Make a Lap Desk With Storage That Saves Space

Build a lap desk with storage by making a shallow lightweight box, adding a hinged top, and attaching a firm cushioned base underneath. Keep the compartment small and the materials light so it stays comfortable, portable, and easy to store.
Learning how to make a lap desk with storage is one of the most practical small-space DIY projects for a home office, bedroom, or dorm. The best version is simple: a lightweight box with a hinged top for hidden storage and a padded base that sits comfortably on your lap, giving you a stable work surface without taking up floor space.
For most readers, the smartest build is not the fanciest one. A compact rectangular top, shallow internal compartment, and breathable cushion underneath will do more for daily usability than extra shelves or thick wood ever will. If you want a portable workstation that can hold a notebook, charging cable, stylus, or pens while still feeling easy to carry, planning the size and weight correctly matters more than decorative details.
- Best design: A shallow box with a hinged lid and padded base is the simplest useful.
- Size first: Measure your actual laptop, tablet, or notebook before choosing dimensions.
- Weight matters: Thin plywood is often a better choice than heavy MDF or thick solid wood.
- Storage limit: Keep the inside for slim essentials, not bulky accessories.
- Comfort check: Use firm padding and watch laptop heat and posture during longer sessions.
How to Make a Lap Desk With Storage: The Simplest Build That Actually Saves Space
What a good storage lap desk needs to do in a small home office
A good lap desk with storage should solve three problems at once: it should create a flat work surface, keep a few essentials contained, and stay comfortable enough to use for more than a few minutes. In a small home office, that matters because every item needs to earn its footprint. A bulky lap desk that is awkward to lift or too deep to store under a bed is not really space-saving.
The most useful design keeps the top large enough for a laptop or notebook but limits the storage cavity to shallow essentials. Think charging cable, pens, sticky notes, earbuds, reading glasses, or a slim tablet. Once the inside gets too deep, the desk becomes heavier, hotter on your lap, and harder to stabilize.
The easiest beginner-friendly design: top surface, cushion base, and hidden compartment
The easiest build for beginners is a shallow wooden box with a lift-top lid and a fabric-covered cushion attached to the bottom. This design avoids complicated joinery and still gives you a polished result. If you can measure accurately, make straight cuts, and install basic hardware, you can build it.
The top surface acts as the work area. The box walls create the hidden compartment. The cushion base helps the desk rest more evenly on your legs while improving comfort and airflow. A small front lip can also help stop a notebook or tablet from sliding forward, especially if you like working from a sofa or bed.
If you have built simple wood projects before, the process will feel similar to a scaled-down version of building a small writing desk, just with far less material and no legs to worry about.
What to Look for Before You Build One
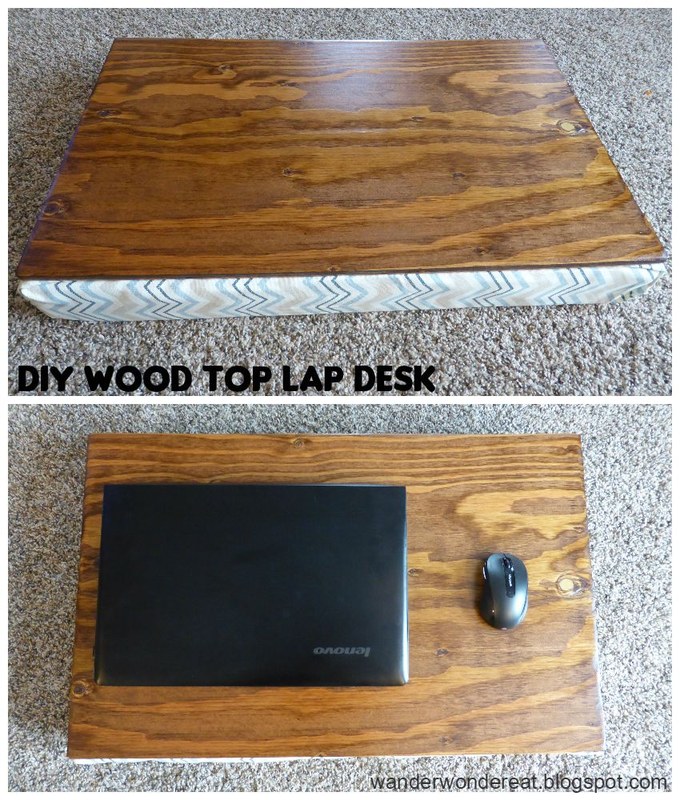
A compact lap desk design is measured for size and storage layout.
Best dimensions for laptops, tablets, notebooks, and compact work setups
Start with the items you actually plan to use on the surface. A lap desk for a 13-inch laptop can be much smaller than one meant to hold a 15-inch laptop plus a mouse. For many people, a top in the range of roughly 16 to 22 inches wide and 11 to 15 inches deep feels practical, but the right size depends on your device and how you work.
If you mainly read, journal, or sketch, a narrower top may be enough. If you use a laptop daily, leave enough side clearance for your wrists and enough front depth so the device does not sit right at the edge. A desk that is technically large enough but visually cramped tends to feel unstable in use.
Dimensions vary by laptop model, case thickness, and whether you want room for a mouse, phone, or notebook beside it. Measure your actual setup before cutting material.
How much storage is useful without making the desk bulky or heavy
Storage is only useful if it does not compromise comfort. A shallow compartment is usually enough for the kind of items that clutter a sofa table or bedside surface. Aim for storage that holds flat or slim supplies rather than bulky accessories.
As a general design principle, keeping the internal depth modest helps in three ways: it reduces overall weight, lowers the desk profile for better wrist position, and makes the piece easier to tuck onto a shelf or into a closet. If you need to store a charger brick, over-ear headphones, or thick planners, a side table or compact desk may be a better fit than a lap desk.
Features worth planning in from the start: lip edge, handle, hinge, and cable slot
Some details are much easier to add before assembly than after. A front lip edge helps prevent slipping. A recessed or cutout handle makes the desk easier to carry from room to room. A hinge choice affects how neatly the lid opens and closes. A cable slot or small notch can be useful if you want to charge a device while it sits on top or store a power bank inside.
Not every build needs all four features. For a clean minimalist desk, a simple magnetic closure and finger-pull notch may be enough. For a student setup, a carrying handle and lip edge may matter more than a cable opening.
- Measure your laptop, tablet, or notebook with any case attached.
- Decide what will actually be stored inside.
- Set a maximum weight goal before choosing wood thickness.
- Plan hardware placement before cutting the lid.
Materials, Tools, and Specifications That Matter Most
Best wood, plywood, MDF, and fabric options for durability and weight
The material choice affects almost everything: weight, durability, finish quality, and how easy the project is to build. Thin plywood is often the best balance for a lap desk with storage because it is lighter than solid wood and usually more durable than MDF in everyday handling. It can also take paint or veneer well, depending on the grade.
Solid wood can look beautiful, especially if you want a warm natural finish, but it may add more weight than necessary. MDF is smooth and beginner-friendly for painted projects, though it tends to be heavier and less forgiving around screws and moisture. If your desk may live in a bedroom with occasional drinks nearby or move frequently between rooms, plywood is often the safer choice.
For the cushion base, choose a durable fabric that is easy to clean and not overly slippery. Cotton canvas, upholstery fabric, and some linen blends can work well. Very delicate fabric may wear quickly at seam edges, while shiny synthetic fabric may slide too much on clothing.
Choosing foam or cushion filling for comfort and airflow
The cushion should support the desk without feeling lumpy or trapping too much heat. Foam gives a cleaner, more structured result. Loose fill can feel softer, but it may shift over time unless it is contained carefully in channels or a fitted pad.
A medium-density foam layer wrapped in fabric is one of the simplest choices for comfort and shape retention. Some DIY builds use a beanbag-style cushion, which can mold nicely to the lap, but it may also make the top feel less steady. If you work with a laptop often, a flatter cushion usually creates better stability.
Laptops generate heat. A cushioned lap desk can improve comfort, but it does not replace the airflow guidance provided by your device manufacturer. Check your laptop’s ventilation needs before using any soft-base surface for long sessions.
Hardware choices: hinges, magnetic closures, screws, and non-slip details
Small hardware choices make a big difference in how finished the desk feels. Basic butt hinges are easy to find and install, while a continuous hinge can distribute stress more evenly across the back edge. Magnetic catches help keep the lid shut when you carry the desk.
Use screws sized appropriately for your material thickness. Oversized screws can split thin panels or poke through unexpectedly. For the top surface, non-slip pads, a cork strip, or a low-profile wooden lip can help hold notebooks and tablets in place without making the desk look clunky.
Step-by-Step: How to Make a Lap Desk With Storage
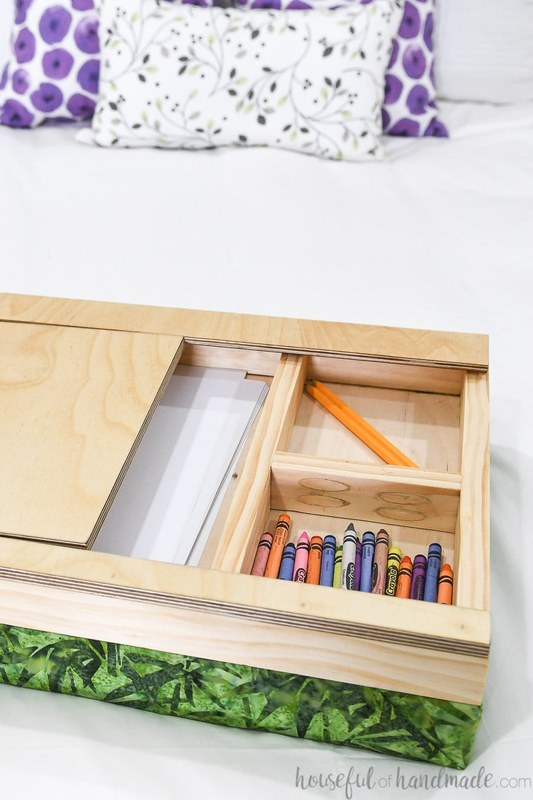
Wood panels, tools, and assembly steps for a lap desk with storage.
Measure and cut the top, side panels, and storage cavity
Begin by deciding your finished top size based on your laptop or notebook. Then determine the depth of the storage compartment and the thickness of the base cushion. Sketch the full build before cutting so you know how the lid, side walls, and bottom structure relate to each other.
Cut one top panel, four shallow side panels, and a bottom panel if your design uses a fully enclosed box above the cushion. If you want the cushion attached directly to the underside of the storage box, keep the box profile as slim as possible. Sand all edges before assembly so the desk feels comfortable against your hands and forearms.
Assemble the box securely without adding unnecessary bulk
Dry-fit the pieces first. Once the dimensions look right, assemble the shallow box using wood glue and screws or brad nails, depending on your tools and material. The goal is a rigid structure that does not flex when lifted from one side.
Keep the walls square and avoid thick framing that eats into the storage space. This project works best when the walls are only as substantial as they need to be. If you overbuild it, the desk will quickly lose its portability.
Add the hinged lid or lift-top surface
Install the top as a hinged lid if you want the cleanest hidden-storage look. Test the hinge movement before final tightening so the lid opens smoothly and sits flush when closed. Add a magnetic catch, small latch, or friction fit to keep it from popping open when moved.
If you prefer a simpler approach, you can build a removable top panel instead of a hinged one, but that tends to feel less secure in daily use. A hinged lid is usually the better long-term choice for a piece that moves around often.
Attach the cushion base for comfort and stability
Cut foam or padding slightly smaller than the underside footprint so the fabric can wrap cleanly around it. Cover the padding with your chosen fabric, pulling it taut enough to avoid wrinkles without compressing the cushion too much.
Attach the finished cushion base to the underside using staples into a wood panel, strong adhesive suited to the materials, or a removable method if you want to replace the cover later. Make sure the cushion sits evenly so the desk does not rock on your lap.
Keep the storage compartment slim and square for better balance and lower weight.
Use hinges and a closure that suit the panel thickness and how often the desk will be carried.
Finish the wood first so dust, paint, or drips do not damage the fabric base.
Finish, paint, or wrap the desk to suit your decor
Once the structure is complete, choose a finish that matches the room where the desk will live most often. Paint gives the most flexibility, especially if you want the piece to blend with shelving, trim, or a bed frame. Clear sealers and stains highlight wood grain and usually make the desk feel more furniture-like.
If you want a coordinated workspace, pull finish colors from nearby furniture or storage bins. Readers trying to create a more cohesive creative corner may also find ideas in this guide on how to organize a desk for an artist, especially if the lap desk will hold sketching or journaling supplies.
Who It Suits and Where It Fits Best
Small apartments, dorm rooms, bedrooms, and living-room work corners
A lap desk with storage is especially useful where a full desk is impractical or visually heavy. In a studio apartment or dorm, it can function as a compact workstation that disappears into a closet or under a bed when not in use. In a bedroom, it can support occasional laptop work or reading without adding another furniture piece.
It also works well in living-room corners where a permanent desk would dominate the space. The smaller the room, the more valuable portability becomes.
Students, remote workers, readers, and crafters who need portable storage
This project suits people who need a few essentials close at hand but do not need a full rolling cart or side cabinet. Students can store pens, chargers, index cards, or a small tablet. Remote workers can keep cables, earbuds, a notebook, and a mouse together. Readers and crafters may prefer it for journaling, pattern notes, or hand tools used in short sessions.
If your setup is expanding beyond a lap desk and into a permanent workstation, it may be worth comparing this project with a more fixed small-space solution such as a small writing desk with storage.
When a lap desk with storage works better than a side table or rolling cart
A lap desk works better when your main priority is portability and surface flexibility. You can use it on a sofa, bed, accent chair, or floor cushion. A side table or rolling cart works better when you need vertical storage, heavier supplies, or a more ergonomic seated posture.
In other words, a lap desk is best for light tasks and compact tools. It is not a full substitute for a dedicated desk if you work long hours every day.
Styling Ideas for a Lap Desk That Looks Intentional, Not Improvised
Modern, minimalist, and warm wood finishes for 2026 home office trends
Current home office styling still leans toward calm, layered materials rather than overly engineered-looking accessories. A lap desk can fit right into that direction if you keep the silhouette simple. Warm oak tones, soft walnut finishes, painted off-whites, muted greens, and matte black hardware all feel current without being trend-dependent.
If you prefer a cleaner look, pair a pale wood top with a neutral fabric cushion. If you want something moodier, try a dark-stained lid with textured woven fabric underneath. The goal is for the desk to read like a small furniture piece, not a temporary craft project.
Think of the lap desk as a miniature storage ottoman turned into a work surface: soft underneath, clean-lined on top, and visually quiet when left out in the room.
How to coordinate fabric, paint, and hardware with existing decor
Start with the hardware finish already present in the room. If your nearby lamp, drawer pulls, or picture frames use black metal, matching the hinge or handle can make the lap desk feel more integrated. If your space has brass accents, a small brass latch or corner detail may look intentional rather than decorative for its own sake.
Fabric should usually connect to the room’s soft furnishings. Pull from a throw pillow, curtain, or upholstered chair rather than introducing a loud new pattern. Paint can either blend in with the existing palette or provide a controlled contrast.
What to store inside so the surface stays clean and visually calm
The best storage choices are the smallest items that usually cause visual clutter: pens, sticky notes, charging cables, a stylus, reading glasses, bookmarks, earbuds, or a slim planner. Storing these inside keeps the top surface open and makes the whole room feel tidier.
Avoid treating the compartment like a junk drawer. If you need help editing down supplies in a compact creative area, this guide on how to organize art supplies in a small space offers useful principles that also apply here.
The Benefits, Limitations, and Most Common Build Mistakes
Why this design saves space and reduces desktop clutter
The biggest benefit is consolidation. Instead of a tray, notebook stack, charger pile, and laptop all drifting around a room, you get one portable object that stores and supports the essentials. It also reduces the temptation to add another small table just to hold work items between sessions.
Because the storage is hidden, the room looks calmer even when the desk is in view. That matters in bedrooms and living rooms where work items can quickly make the space feel visually busy.
Weight, heat, and posture limitations to consider before daily use
Even the best DIY lap desk has limitations. It can become heavy if built from thick materials. It may trap heat if used with a laptop for long periods. And it usually does not offer the same posture support as a properly sized desk and chair.
For occasional work, reading, or planning, those tradeoffs may be reasonable. For full-time remote work, they are more important. A lap desk is a convenience tool, not a complete ergonomic workstation.
- Portable and easy to store
- Keeps small supplies hidden
- Useful in bedrooms, sofas, and dorms
- Can be customized to match decor
- Not ideal for long work sessions
- Can get heavy if overbuilt
- Limited internal storage
- Laptop heat needs attention
Mistakes that make DIY lap desks uncomfortable, unstable, or too shallow
The most common mistake is making the desk too deep and too heavy. Many DIY plans assume more storage is better, but a lap desk should stay compact. Another common issue is choosing a cushion that is too soft, which lets the work surface wobble.
Other problems include forgetting clearance for the hinge, using fabric that slides on clothing, skipping edge sanding, or adding a lip that is so tall it interferes with typing. A final mistake is building the storage so shallow that it cannot hold the few items you actually need, so measure real objects instead of guessing.
- Keep the box shallow and the cushion firm enough for stability.
- Measure your actual laptop, notebook, and stored items before cutting.
- Finish the wood before attaching fabric.
- Using thick heavy panels just to make it feel sturdier.
- Overstuffing the cushion so the desk rocks in use.
- Planning storage for bulky accessories better suited to a cart or drawer.
Care, Maintenance, and Long-Term Value
How to clean wood, painted finishes, and fabric bases
For routine care, dust the top regularly and wipe it with a soft, slightly damp cloth when needed. Painted finishes should be cleaned gently to avoid dulling or chipping edges. Fabric bases benefit from light vacuuming or spot cleaning, depending on the material and whether the cover is removable.
Always check the finish product instructions you used during the build, especially for stain, wax, or clear coat cure times and cleaning compatibility.
When to repair hinges, replace padding, or refinish the top
Over time, the hinge screws may loosen, especially if the lid is opened frequently or the desk is carried one-handed. Tighten hardware as needed and inspect the closure if the lid starts to shift. Padding may compress after long use, particularly with softer foam or fill.
The top is the surface most likely to show wear from laptops, mugs, pens, or books. If it becomes scratched or dull, light sanding and refinishing may restore it, depending on the original material and finish.
DIY cost versus buying a ready-made lap desk with storage
DIY can offer better control over size, finish, and storage layout, especially if you already have leftover wood, fabric, or basic tools. Buying ready-made may offer better value if you need something immediately or do not want to source hardware and finishing supplies separately.
Costs vary widely by material, tool ownership, and retailer, so it is worth pricing out your exact build before starting. If you are comparing options, confirm current dimensions, materials, and return policies on official product listings rather than assuming all lap desks with storage are built the same way.
Final Recommendation: The Best DIY Approach for a Space-Saving Lap Desk
When this project is worth making yourself
This project is worth making if you want a very specific size, a finish that matches your room, or a storage layout tailored to a few daily essentials. It also makes sense if your goal is a cleaner-looking portable work surface rather than maximum storage.
When a ready-made option may offer better value or ergonomics
A ready-made option may be the better choice if you need a lighter molded design, more refined laptop cooling features, or a more ergonomic angle than a simple box build can provide. It may also be more practical if you do not already own the tools needed for accurate cutting and hinge installation.
For most small-space home offices, the best DIY route is a shallow plywood box with a hinged lid, magnetic closure, firm cushion base, and a finish that blends into the room. Keep it light, keep the storage limited to true essentials, and the desk will be far more likely to save space in real life rather than just in theory.
Frequently Asked Questions