How to Hang Picture Ledge Without Nails
You can hang a picture ledge without nails by using heavy-duty adhesive strips, removable wall hooks, or a tension-mounted alternative, depending on the ledge weight and wall type. Keep the display light, follow cure times, and check the mount regularly for safety.
If you want the look of a picture ledge without drilling into the wall, there are several smart no-nail options that can work beautifully. The best method depends on the ledge’s weight, the wall surface, and how much you plan to display on it.
- Best method: Match the hanging system to the ledge’s weight and your wall surface.
- Safety first: Count frames, books, and objects in the total load.
- Style rule: Keep no-nail ledges visually light for the best hold and look.
- Installation: Clean, align, press firmly, and wait for full cure time.
- Removal: Use gentle, manufacturer-approved methods to protect paint.
Why Hang a Picture Ledge Without Nails in a Modern Interior
Picture ledges have become a favourite tool for people who like to refresh a room without committing to a permanent layout. In a modern home, that flexibility matters just as much as the display itself.
Rentals, heritage walls, and damage-free styling goals
No-nail hanging is especially useful in rentals, where wall damage can affect deposits or permissions. It also suits heritage walls, delicate plaster, and painted surfaces that you’d rather not puncture unnecessarily.
For anyone who likes to rotate art seasonally, the appeal is practical as well as aesthetic. You can shift prints, books, and objects with far less fuss, which is ideal for small spaces that need to do more than one job.
How picture ledges support artful, flexible display in 2026 homes
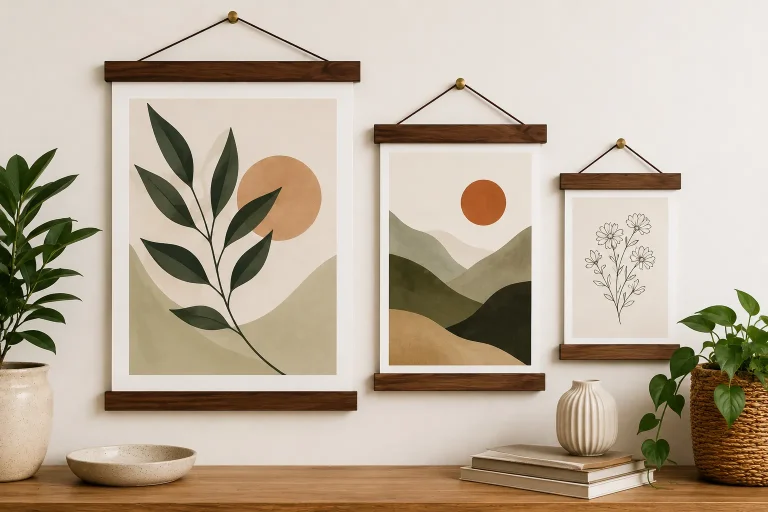
In 2026 homes, picture ledges are often used less like fixed shelves and more like living compositions. They let you layer framed prints, postcards, ceramics, and books in a way that feels edited rather than overly matched.
If you enjoy a changing wall story, ledges are one of the easiest formats to work with. They support that gallery-like feel without asking you to commit to a single arrangement forever.
No-nail methods are best for lightweight to medium-duty ledges. If your ledge will hold heavy frames, glass, or books, always check the mount rating carefully before styling it.
Choosing the Right No-Nail Hanging Method for Your Picture Ledge
The method you choose should match both the ledge and the wall. A beautiful shelf is only as useful as the hanging system behind it, so this is one place where restraint pays off.
Heavy-duty adhesive strips for lightweight ledges and framed prints
Heavy-duty adhesive strips can be a clean solution for slim ledges and very light styling. They work best when the ledge itself is modest in size and the display is limited to small framed prints or lightweight paper pieces.
This option is often the most visually discreet, which suits minimalist interiors. It is also helpful when you want to avoid visible hardware, especially in bedrooms, hallways, or calm reading corners.
Removable wall hooks for medium-weight ledges in living rooms and bedrooms
Removable wall hooks are a good middle ground when you need a little more support than adhesive strips alone can provide. They tend to work well for medium-weight ledges in dry, painted interiors where the wall finish is reasonably smooth.
They are often the better choice if you plan to style the ledge with a few framed pieces plus one or two decorative objects. For a broader room-planning perspective, it can also help to compare picture ledge shelves vs hanging individual frames before deciding how much flexibility you really want.
Tension-mounted or freestanding alternatives for awkward walls and temporary setups
If the wall is awkward, temporary, or difficult to bond to, tension-mounted or freestanding alternatives can be the most elegant answer. These are especially useful for tiled bathrooms, awkward alcoves, or spaces where you want the look of a ledge without relying on adhesive alone.
Freestanding options can also be a lovely choice for styling on consoles, desks, or narrow floor spaces. They work particularly well when the wall surface is not ideal but you still want a layered, artful display.
- Reduces wall damage in rentals and heritage homes
- Makes seasonal styling easier
- Supports a lighter, more flexible gallery look
- Can suit small rooms where permanence feels restrictive
Weight, Wall Type, and Safety: What to Check Before You Start
This is the part many people skip, but it matters most. A no-nail hanging method is only reliable when the wall, the ledge, and the objects on it are all working within the same limits.
Matching the ledge load to plaster, drywall, tile, brick, or painted surfaces
Different wall types behave very differently. Smooth painted drywall is usually the easiest surface for adhesive systems, while plaster, tile, brick, and textured finishes often need more cautious planning or a different approach altogether.
Before buying anything, confirm whether the product is rated for your wall surface. If the ledge is going into a bathroom or kitchen, humidity and temperature changes also deserve attention.
- Wall material and finish
- Weight of the ledge itself
- Total display weight, not just the shelf
- Humidity, heat, and sunlight exposure
- Whether the mount is removable or residue-free
How frame weight, books, candles, and small objects change the equation
A ledge that looks light when empty can become much heavier once styled. Glass frames, art books, candles, and small ceramics add up quickly, and the load is often greater than it appears.
If you want to display books, choose fewer items and keep them upright or stacked low. For a more editorial and less crowded result, see how to arrange frames on a picture ledge without clutter for layout ideas that help keep weight and visual density under control.
Style trade-offs between slim minimalist ledges and sturdier display shelves
Slender ledges look refined and almost disappear into the wall, which is beautiful for prints and light objects. But they usually offer less forgiveness if you want to lean larger frames or build a layered arrangement.
Sturdier display shelves can handle more weight and give you more confidence, but they read more visibly as furniture. That is not a downside if you want a grounded, architectural look; it simply changes the mood.
- Light prints and postcards
- Minimalist bedrooms
- Rental-friendly styling
- You want to display heavy books
- Your wall is highly textured
- You need long-term structural support
Step-by-Step Guide to Hanging a Picture Ledge Without Nails
The installation itself should feel calm and measured, not rushed. A few careful steps at the beginning will make the finished display look more intentional and hold up better over time.
Measuring height for gallery-style eye level, above-sofa placement, or bedside styling
Start by deciding the ledge’s role in the room. Gallery-style placement usually sits around eye level, while above-sofa styling often needs a little more height to preserve visual balance.
For bedside styling, keep the ledge low enough to feel connected to the furniture rather than floating awkwardly above it. If you are planning a more layered wall, how to style picture ledges for layered art display offers useful ideas for building depth without visual noise.
Cleaning, marking, aligning, and pressing for a secure bond
Clean the wall surface thoroughly before applying any adhesive or hook system. Dust, oils, and residue can weaken the bond, especially on painted walls.
Mark your placement carefully, use a level, and press each component firmly for the recommended time. If the system depends on pressure to bond, that final step is not optional; it is part of the installation, not a detail.
Choose the height, check the width, and confirm the ledge will sit comfortably with nearby furniture or artwork.
Wipe the surface with a suitable cleaner and let it dry fully before applying the mount.
Use a level and light pencil marks if needed so the ledge sits straight the first time.
Apply steady pressure according to the product instructions so the adhesive or hook can bond properly.
Setting cure time before adding art, books, or decorative objects
Even when a mount feels secure immediately, it may still need cure time before it reaches full strength. That waiting period is one of the easiest ways to protect both your wall and your display.
Once the ledge is in place, add objects gradually rather than loading everything at once. This is especially wise if you are using a removable system or if the surface is slightly uneven.
Avoid placing valuable or fragile pieces on a newly mounted ledge until the adhesive has fully cured. Heat, humidity, and direct sun can also affect long-term hold and the condition of artwork.
Styling Ideas for Art, Books, and Creative Displays
Once the ledge is secure, the fun begins. The best displays feel collected over time, even when they are carefully planned.
Layering framed prints, small canvases, and postcards for an editorial look
Layering is what gives a picture ledge its editorial charm. Start with one or two anchor pieces, then lean smaller works in front or slightly off-centre to create depth and movement.
If you enjoy a more curated print-led wall, consider combining framed drawings, small canvases, and postcards with a restrained palette. For a related approach to larger paper pieces, how to hang a large poster without a frame can help you think about scale and presentation.
Think of the ledge as a changing shelf of visual notes: one artwork for structure, one smaller piece for contrast, and one object for personality. The result feels collected, not cluttered.
Using picture ledges to display art books, zines, and collectible objects
Picture ledges are excellent for art books and zines because they let covers become part of the room’s visual language. A few carefully chosen titles can look as considered as framed work.
Collectible objects such as small vases, stones, or ceramic pieces also work well when used sparingly. The key is to keep enough breathing room around each item so the display stays legible.
A beautifully designed art book with a strong cover can do double duty as decor and reading material. Look for one with a restrained spine or cover palette so it blends with your frames rather than competing with them.
Seasonal styling with ceramics, candles, and giftable pieces
Seasonal styling works best when the changes are subtle. A winter ledge might include a small ceramic vessel and muted prints, while a summer arrangement could feel lighter with pale paper works and a single candle.
If you are styling a ledge as a giftable corner, think about pieces that are easy to move and easy to love. This is where a picture ledge becomes more than storage; it becomes a quiet display of changing rituals.
Curator-Approved Design Tips for a Balanced, Elevated Look
The most polished picture ledges rarely look overworked. They rely on proportion, repetition, and just enough contrast to keep the eye moving.
Mixing frame finishes, textures, and heights without visual clutter
Mixing finishes can look sophisticated when there is a clear visual thread. For example, one warm wood frame, one black frame, and one soft neutral print can feel layered without appearing random.
Height variation also helps, but keep the range controlled. Too many competing angles can make the ledge feel busy, especially in smaller rooms.
Using lighting to highlight ledges in hallways, reading corners, and studios
Lighting can transform a simple ledge into a focal point. Soft wall light, a nearby lamp, or a directional picture light can make framed art and book covers feel more intentional after dark.
In hallways and studios, this is especially effective because the display often needs to read clearly in passing light. If you want to go deeper on this, how to choose a picture light for artwork is a helpful next read.
Choosing color palettes that complement contemporary, Scandinavian, or gallery-inspired interiors
Contemporary interiors often suit monochrome frames, clean white mats, and one or two accent colours. Scandinavian rooms usually feel best with pale woods, soft neutrals, and airy spacing.
Gallery-inspired spaces can handle more contrast, but even then, restraint is what keeps the look elevated. Think in terms of tone, texture, and balance rather than simply filling the shelf.
Care, Maintenance, and Damage-Free Removal
A no-nail picture ledge should remain secure and attractive over time, not just on installation day. A little maintenance goes a long way.
How to check adhesion over time and avoid overloading the ledge
Check the ledge periodically, especially after temperature changes or if the room gets humid. Any lifting, shifting, or softening at the edges is a sign to reduce weight and reassess the mount.
It is also wise not to treat a no-nail ledge like a permanent storage shelf. Decorative restraint is part of its charm, and it is usually what keeps the setup safe.
Cleaning painted walls and ledge surfaces without weakening the mount
Dust the ledge regularly with a soft cloth so grime does not build up around the mount. Avoid harsh scrubbing near adhesive points, since that can loosen the bond over time.
For painted walls, use gentle cleaning methods and keep moisture to a minimum. If the ledge is near windows, sunlight can fade prints and dry out some finishes, so rotate delicate pieces when needed.
Removing adhesive systems safely when redecorating or moving
When it is time to remove the ledge, follow the manufacturer’s instructions rather than pulling it away quickly. Gentle release is what helps preserve the wall finish and reduce residue.
If you are moving or reworking a room, this is a good moment to reassess the display. Many people use the same ledge to create a new arrangement rather than replacing it entirely, which keeps the process economical and creative.
Creative Recap: The Best No-Nail Picture Ledge Setup for Your Space
The best no-nail picture ledge is the one that suits your wall, your objects, and the way you actually live in the room. A thoughtful choice will always look better than an overambitious one.
Quick recommendations by room, budget, and styling ambition
For rentals and small bedrooms, lightweight adhesive systems are often the simplest place to start. For living rooms and more layered displays, removable hooks or sturdier no-nail systems usually offer a better balance of flexibility and confidence.
If your styling ambition includes books, ceramics, and changing seasonal objects, choose the most secure option your wall can safely support. For more detailed product guidance, best picture ledge shelves for framed art display can help you compare styles before buying.
Price context for budget-friendly, mid-range, and design-led options
Entry-level no-nail solutions are usually the easiest way to test a layout, especially if you are styling light prints only. Mid-range options tend to offer better finish, stronger support, or more refined hardware.
Investment pieces are worth considering when you want a ledge that becomes a lasting part of the room’s architecture. In that case, quality of mount and finish matters as much as appearance.
Final inspiration for building a flexible, artful wall display without nails
Learning how to hang picture ledge without nails is really about making your walls more adaptable. Once you have the right system in place, you can treat the ledge as a small stage for art, books, and objects that change with the season.
That flexibility is what makes the look feel modern. It is practical, gentle on the wall, and endlessly open to reinterpretation, which is exactly why picture ledges remain such a beautiful choice for curated homes.
Recommended Products
SHOP THIS SETUP
Command Picture Ledge, White, 21 in
This is the most straightforward no-nails option for creating a picture-ledge look without drilling into the wall. It uses Command adhesive technology for damage-free hanging, making it especially useful for renters or anyone who wants a clean, removable display solution for framed art and small decor.
Frequently Asked Questions
Yes, you can use heavy-duty adhesive strips, removable wall hooks, or tension-mounted alternatives. The best choice depends on the ledge weight, wall type, and what you want to display.
The safest option is the one rated for your wall surface and total load. For heavier styling, removable hooks or a sturdier support system is usually more reliable than adhesive alone.
They can, but only for lightweight ledges on suitable smooth surfaces. Always include the weight of frames and objects, not just the shelf itself.
Smooth painted drywall is usually the easiest surface for no-nail systems. Textured plaster, brick, tile, and humid rooms may need a different approach.
Wait for the full cure time listed by the manufacturer before adding art or decor. This helps the mount reach its intended strength and stability.
Follow the product instructions carefully and remove it slowly rather than pulling it away. Gentle removal usually reduces residue and protects the wall finish.