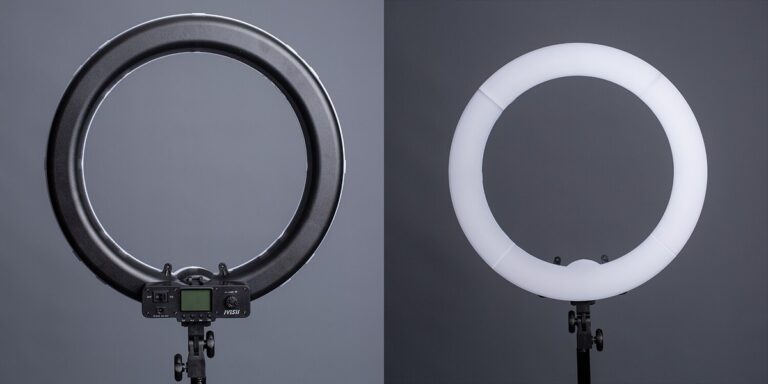
Ring Light Before and After

A ring light before and after usually shows softer shadows, brighter skin tone, and cleaner detail in close-up shots. The best results come from choosing the right size, brightness, and placement for your room.
ring light before and after comparisons are usually about subtle changes, not magic: better evenness, cleaner catchlights, and a more polished look when the light is placed well. For Hurrell Editions readers, the real question is how to get a flattering result that still feels natural in a home, bedroom, desk setup, or small studio.
- Lighting change: Ring lights mainly improve evenness, catchlights, and clarity rather than creating a dramatic transformation.
- Best use case: They work especially well for beauty content, video calls, and product photos in small.
- Buying priority: Size, dimming, and color temperature matter more than extra accessories.
- Common mistake: Too much brightness or poor placement can make the image flat, harsh, or reflective.
- Long-term value: Stable build quality and easy storage help a ring light stay useful over time.
Ring Light Before and After: What Changes You Can Expect
A ring light can noticeably change how a face, product, or small scene reads on camera, but the effect depends on distance, brightness, and color temperature. The “before” is often a scene lit by overhead bulbs, window light, or a dim room; the “after” is typically more even, brighter, and easier to see clearly.
What changes most is not the subject itself, but the way the light shapes it. Shadows soften, details become more legible, and the frame can feel more intentional, which is why ring lights are so common for beauty content, video calls, and product photos.
How Ring Lights Create the “Before and After” Effect
Ring lights work by placing a broad, circular source close to the camera axis. That setup reduces harsh side shadows and creates a more symmetrical look, which is why the change is so easy to notice in side-by-side comparisons.
Softening Shadows and Evening Out Skin Tone
One of the biggest visual differences is shadow control. When a light source is close to the camera, it fills in under-eye shadows, nose shadows, and uneven patches that can make skin look tired or textured.
That does not mean a ring light erases texture entirely. It simply makes the lighting more even, so skin tone often looks smoother and less dramatic. For creators, that can be helpful when the goal is clarity rather than cinematic mood.
Adding Catchlights and Visual Definition
Ring lights are known for the circular catchlight they place in the eyes. In portraits and close-up content, that small reflection can make a face feel more alive and visually centered.
The same principle helps product shots. A bottle, frame, or craft item can look more defined when the lighting creates clean highlights and controlled reflections instead of random glare.
Ring lights are especially popular for close-range work because their circular shape helps reduce the harsh shadow pattern that a single bare bulb can create.
Why the Same Subject Can Look Different by Angle and Distance
The “after” image changes quickly as you move the light. Too close, and the light can look flat or reflective; too far away, and it may stop filling shadows effectively. A small shift in angle can also change whether the light feels flattering or washed out.
That is why ring light results are less about the product alone and more about setup. If you want a more controlled comparison, think in terms of position, height, and brightness rather than expecting one universal look.
What to Look For in a Ring Light for the Best Results
The best ring light for a strong before-and-after effect is the one that fits your room, your subject, and your workflow. Manufacturer specs matter, but so does the way the light will actually sit in your space.
Size, Brightness, and Color Temperature
Size affects how soft the light feels. Larger ring lights generally spread light more broadly, which can be helpful for faces and small scenes, while smaller ones may be better for tight desks or quick content setups.
Brightness should be adjustable if you plan to use the light for both daytime and evening use. Color temperature matters too: cooler settings can look crisp and clean, while warmer settings may feel softer and more flattering in bedrooms or relaxed interiors. If a model includes dimming and a wide temperature range, that usually gives you more control over the final look.
- Choose a size that fits your desk, vanity, or floor space without crowding the room
- Confirm whether brightness and color temperature are adjustable
- Check the official product listing for included stand, phone mount, or accessory details
- Review the manufacturer’s care and safety instructions before use
Power Source, Mounting Style, and Adjustability
Power source affects convenience. Plug-in lights are often better for longer sessions, while battery-powered or rechargeable options can be easier to move around the home. The best choice depends on whether you need a permanent setup or a flexible one.
Mounting style also matters. Some ring lights attach to a tripod, some sit on a desk stand, and others combine with a phone holder or mirror-style setup. For readers comparing lighting accessories, our guide to what a dimmable picture wall light is is helpful for understanding how adjustable light changes the mood of a room, even though the format is different.
Build Quality, Materials, and Included Accessories
Build quality affects both stability and long-term value. A ring light that wobbles, overheats, or comes with flimsy adjustment points can be frustrating even if the output looks good in photos.
Look closely at the stand, tightening knobs, phone holder, and any included remote or diffuser-style accessories. Exact materials and durability vary by model, so it is worth checking the official listing rather than assuming a finish or frame type based on appearance alone.
Always confirm the manufacturer’s electrical guidance, especially for plug-in models near sinks, makeup areas, or humid rooms. If you are placing lighting near mirrors or furniture in a tight space, make sure cords are routed safely and the setup will not tip or snag.
Where a Ring Light Works Best in the Home or Studio
Ring lights are most useful where the subject is close to the camera and where you want a brighter, cleaner look without building a full lighting rig. That makes them practical for apartments, desks, dressing areas, and compact creative corners.
Beauty and Content-Creation Setups
For makeup, skincare, short-form video, livestreaming, and product demos, ring lights are a natural fit. They help the face stay readable on camera and make it easier to keep the scene consistent from one session to the next.
If you are building a small creator setup, it can help to think about the whole lighting environment, not just the ring light itself. A ring light often works best when paired with a tidy background and a stable camera position rather than competing with too many other light sources.
If your room has both window light and a ring light, try to keep the ring light as the main fill source and avoid mixing it with strong overhead bulbs that create a different color cast.
Desk, Bedroom, and Small Apartment Placement
In small rooms, placement is about balance. A desk-mounted or compact tripod setup can work well in a bedroom corner, while a larger floor stand may be better if you need to move the subject around the room.
For tight spaces, scale matters more than style. A ring light that is too large can overwhelm a vanity or desk, while one that is too small may not create the evenness you want. If you are also shopping for room-friendly picture lighting, our article on the best gallery picture light for small spaces offers a useful comparison of compact lighting priorities.
Which Rooms and Styles It Fits Best
Ring lights fit best in rooms where function comes first: modern bedrooms, home offices, makeup corners, craft rooms, and content studios. They can also blend into minimalist interiors if the stand and wiring are kept visually quiet.
In more decorative rooms, the light may feel utilitarian unless you choose a finish and form that matches the space. Matte black, white, or metal-finished models usually disappear more easily than bulky, highly reflective designs.
Styling Tips for a Better Ring Light Before and After Look
The best results come from treating the ring light as part of the room, not a separate gadget. Position, background, and nearby surfaces all influence whether the final image feels polished or obvious.
Positioning for Flattering Faces and Product Shots
For faces, keep the light centered and slightly above eye level when possible. That tends to create a more natural shape and avoids an overly flat look. For product shots, move the light until reflections are controlled rather than blown out.
Distance matters too. Closer placement usually gives a softer, more even look, while a slightly farther setup can preserve more texture. The right choice depends on whether you want beauty-style smoothing or more detail for objects and materials.
Place it near eye level for people, or slightly above the object for product photos.
Increase output slowly until shadows soften without washing out the subject.
Look for glare, uneven highlights, or a distracting stand before you start.
Matching Backgrounds, Props, and Decor
A ring light can make a scene look sharper, so the background should usually be simpler than the subject. Neutral walls, tidy shelves, or a single decorative object often work better than busy patterns.
If you want the “after” photo to feel elevated rather than clinical, choose props that repeat the room’s color story. A soft-toned throw, a ceramic tray, or a framed print can help the setup feel intentional without stealing attention.
- Use one or two background colors to keep the frame calm and readable
- Match accessory finishes so the stand does not clash with nearby decor
- Leave negative space around the subject so the light effect feels cleaner
Using Ring Lights with Mirrors, Shelving, or Wall Art
Mirrors can amplify a ring light, but they can also expose the stand, cord, or camera position if the angle is wrong. Shelving and wall art work better when they sit outside the brightest part of the frame, so the subject stays dominant.
If you are styling a wall behind the setup, think about how the light will interact with reflective frames and glass. For a more room-specific approach, the guides to best gallery picture light for bedroom and best gallery picture light for hallway can help you compare how different lighting goals change the atmosphere of a space.
Benefits, Limitations, and Common Mistakes
Ring lights are useful, but they are not the right answer for every look. Understanding the trade-offs helps you avoid disappointment and choose a setup that matches your actual needs.
Where Ring Lights Excel
Ring lights excel at close-range, controlled lighting. They are especially good when you need a subject to look clearer, brighter, and more centered without much setup time.
They also work well in small spaces because they can combine the function of a key light and fill light in one piece of equipment. That makes them appealing for renters, students, content creators, and anyone who wants a simple lighting upgrade.
- Softens shadows in close-up images
- Creates a clean, recognizable catchlight
- Works well in compact rooms and desk setups
- Usually easier to set up than multi-light systems
- Can look flat if placed too close or too centered
- May create glare on glasses, glossy packaging, or mirrors
- Some models feel unstable or underpowered in larger rooms
- Color quality and brightness vary widely by model
When the Effect Looks Flat or Unnatural
A ring light can look unnatural when it is the only source and the subject is too close to the camera. In that case, the face or object may lose dimension and start to look overly even, almost like a cutout.
This is where moderation helps. Lower brightness, increase distance, or add a second soft source from the side if the model and room allow it. The goal is not to erase all shadow, but to keep the image readable and balanced.
Placement Errors, Overexposure, and Color Cast Issues
The most common mistakes are simple: placing the light too low, setting the brightness too high, or using a color temperature that clashes with the room. Any of those can make the after image look harsher instead of better.
Color cast can also happen when the ring light mixes with warm lamps or cool daylight. If the room has mixed lighting, turn off competing sources when possible or adjust the ring light to match the dominant light in the space.
Specifications such as lumen output, color temperature range, tripod height, and included accessories vary by model. Always confirm the exact details on the retailer page or manufacturer listing before buying.
Care, Maintenance, and Long-Term Value
A ring light can last longer and perform more consistently when it is stored and handled with a little care. Since many models are used in busy rooms, small habits make a real difference over time.
Cleaning, Storage, and Cable Management
Dust can build up on the light face, stand, and cord, especially if the light lives near a vanity or desk. A soft, dry cloth is usually the safest first step, but always follow the manufacturer’s instructions for the finish and lens surface.
When storing the light, keep cables loosely coiled and avoid bending joints or clips at sharp angles. If the setup moves between rooms, a simple storage spot can prevent wobbling parts and reduce wear on adjustment points.
Replacement Parts, Durability, and Everyday Use
Long-term value often depends on whether the brand offers replacement parts or at least clearly identifies compatible accessories. A sturdy stand, secure mount, and replaceable power components can matter more than flashy extras.
For everyday use, the best model is usually the one that is quick to set up, easy to adjust, and stable enough that you do not need to fight it each time. If you are comparing lighting tools for different tasks, it may also help to read about how to choose a picture light for artwork, since the decision criteria overlap in useful ways: brightness, placement, and room fit.
Final Verdict: Is a Ring Light Worth It for Your Needs?
For most people, a ring light is worth it when the goal is a cleaner, more flattering, and more controlled image in a small or medium space. It is especially useful if you want a visible improvement without learning a complicated lighting setup.
Best For Beginners, Creators, and Home Styling
Beginners benefit from the simplicity. Creators benefit from the repeatable look. Home stylists benefit from the way a ring light can make a desk, vanity, or content corner feel more polished with minimal equipment.
If you are choosing one, prioritize the model that fits your room scale, offers adjustable output, and feels stable enough for regular use. That combination usually delivers the most reliable before-and-after improvement.
When to Choose an Alternative Lighting Setup
If you want dramatic shadows, cinematic depth, or a more editorial portrait style, a ring light may not be the best match. A softbox, side light, or multi-light setup can create more dimension and a less symmetrical result.
Choose an alternative if your subject is large, your room is very bright, or you need more control over texture and mood. For close-up, practical, and renter-friendly lighting, though, a ring light remains one of the easiest ways to improve the look of a space and the clarity of a shot.
Frequently Asked Questions