How to Display Children’s Artwork in a Stylish Home: 15 Beautiful Ideas
The best way to display children’s artwork in a stylish home is to treat it like real art. Choose a clear display zone, use matching frames or art ledges, rotate pieces often, and keep the color palette calm so the artwork feels joyful without making the room look cluttered.
Children’s artwork can look beautiful in a grown-up home when you use simple framing, thoughtful placement, and a regular rotation system. The goal is not to hide the handmade charm. The goal is to give it a neat, intentional place to shine.
I’m Julian Mercer, and I believe children’s art deserves more than a fridge magnet and a crowded corner. A bright crayon drawing, a painted handprint, or a messy watercolor can bring more warmth to a room than many store-bought prints.
But I also understand the problem. Kids bring home a lot of artwork. Some pieces are large. Some are wrinkled. Some use glitter, glue, and thick paint. If you display every piece at once, the room can start to feel busy fast.
In this guide, I’ll show you how to display children’s artwork in a stylish home without losing the sweet, personal feeling that makes it special.
Why Children’s Artwork Can Look Stylish
Children’s artwork has something many polished prints do not have: personality. The lines are loose. The colors are brave. The subject is honest. That is why it can work so well in a stylish home.
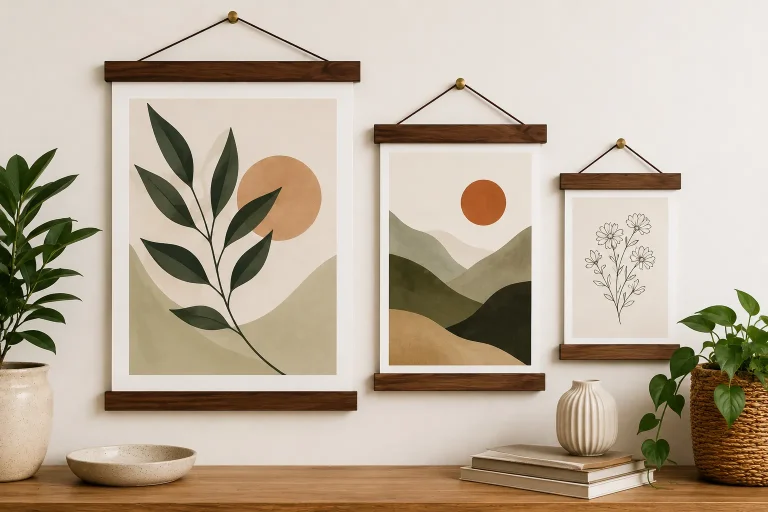
The secret is contrast. Child-made art feels playful, so the display method should feel clean. A simple frame, a white mat, a wood hanger, or a neat art ledge can turn a loose drawing into a charming design feature.
If you enjoy styling your walls, our Art & Frames guide is a useful place to explore more framing and display ideas for family-friendly homes.
Many museums and galleries use simple spacing, neutral mats, and repeated frame styles to make different artworks feel connected. You can use the same idea at home with children’s drawings.
Start With One Display Zone
The first step is choosing where the artwork will live. This matters more than the frame style.
A single display zone makes the art feel curated. It also stops drawings from spreading across every wall, door, shelf, and cabinet.
Best Places to Display Children’s Artwork
- A hallway wall
- A breakfast nook
- A playroom wall
- A home office corner
- A stair landing
- A kitchen command center
- A child’s bedroom wall
I like hallways because they work like a mini home gallery. They are easy to update, and the artwork becomes part of daily family life.
Think of your child’s art wall as a small family gallery. It does not need to be perfect. It only needs rhythm, space, and a little care.
How to Display Children’s Artwork Step by Step
Pick one area that gets seen often but does not compete with too many other objects. A clean wall works best.
Use matching frames for a polished look, art ledges for easy swapping, or clipboards for a relaxed creative space.
Choose the strongest pieces. Look for color, shape, story, or emotion. You do not need to display everything at once.
Use painter’s tape to mark frame sizes on the wall before hanging. Keep spacing even for a cleaner look.
Change the display monthly, seasonally, or after big school projects. Store favorites safely so they do not get damaged.
Best Display Ideas for a Stylish Home
1. Use Matching Frames
Matching frames are the easiest way to make children’s artwork feel intentional. Black, white, oak, or walnut frames all work well.
If the artwork is very bright, I usually choose a simple frame. The frame should calm the piece, not compete with it.
Use the same frame color but vary the frame size. This gives the wall personality while still keeping the look cohesive.
2. Try Front-Opening Kids Art Frames
Front-opening frames are made for families who want to rotate artwork fast. They open from the front, so you do not need to remove the frame from the wall each time.
Many also store extra sheets behind the front piece. This is useful when your child brings home new artwork every week.
For busy families, I like front-opening art frames because they combine display and storage. They make the wall look neat while keeping favorite drawings close by.
3. Use Art Ledges
Art ledges are great if you do not want to commit to one layout. You can lean framed artwork, small canvases, and even children’s craft pieces on the ledge.
This is a good option for renters too. You install the ledge once, then change the display as often as you like.
4. Create a Mini Gallery Wall
A mini gallery wall works well in hallways, playrooms, and family rooms. Keep it small and structured. Four to eight pieces are usually enough.
Mix children’s artwork with family photos, small prints, or simple typography. This makes the wall feel more designed and less like a school noticeboard.
For more home styling ideas, visit our Creative Living section.
5. Use Clipboards for a Casual Look
Clipboards are affordable and easy to update. They work well in playrooms, craft corners, and homeschool spaces.
To keep the look stylish, use matching clipboards. Wood clipboards feel warm. White clipboards feel clean. Black clipboards look modern.
6. Make a Rotating Wire Display
A wire display with small clips can look charming when used carefully. It is best for casual spaces, not formal living rooms.
Keep the line straight and avoid overcrowding. Leave breathing room between each piece.
Display Method Comparison
| Display Method | Best For | Style Level | Ease of Rotation |
|---|---|---|---|
| Matching frames | Living rooms, hallways, formal spaces | High | Medium |
| Front-opening frames | Busy families and frequent art swaps | High | Very easy |
| Art ledges | Flexible displays and renters | High | Very easy |
| Clipboards | Playrooms and craft areas | Casual | Very easy |
| Wire and clips | Bedrooms and creative corners | Casual | Very easy |
Why Styling Matters
Styling matters because children’s artwork is often bold and busy. Without structure, it can make a room feel cluttered.
When you add a clear system, the same artwork feels special. A frame says, “This matters.” A ledge says, “This has a place.” A clean layout says, “This belongs in our home.”
For general art care and display inspiration, I also like browsing museum resources from The Met Museum and home styling ideas from Apartment Therapy.
Do’s and Don’ts for Displaying Children’s Artwork
- Use one main display area.
- Choose simple frames or holders.
- Rotate artwork often.
- Save special pieces in a flat folder.
- Add labels with the child’s name and date.
- Do not display every piece at once.
- Do not use too many frame colors.
- Do not place paper art in direct sun.
- Do not hang heavy frames too low.
- Do not tape fragile pieces directly to the wall.
Style Guide: Make Kids Art Fit Your Home
Budget Estimate
Room-by-Room Display Ideas
| Room | Best Display Choice | Why It Works |
|---|---|---|
| Kitchen | Small rotating frame or clipboard row | Easy to update and family-friendly |
| Hallway | Mini gallery wall | Turns daily walking space into a home gallery |
| Living room | Matching frames with mats | Keeps the display polished and intentional |
| Playroom | Wire display or clipboards | Fun, flexible, and easy for children to enjoy |
| Bedroom | Art ledge or front-opening frame | Personal without overwhelming the room |
Pro Tips for a Cleaner Look
- Use white mats to make small drawings feel more important.
- Group artwork by color for a calmer wall.
- Photograph bulky 3D crafts and display the photo instead.
- Use the same frame finish across the whole display.
- Leave space between pieces so the wall can breathe.
- Rotate art before the display starts to feel crowded.
Common Mistakes to Avoid
Displaying Too Many Pieces
This is the most common mistake. Too much artwork at once can make even beautiful pieces look messy. Choose favorites and store the rest.
Using Too Many Different Frames
A mix of frame styles can work, but it is harder to control. If you want an easy stylish look, keep the frames similar.
Forgetting About Sunlight
Paper fades in direct sun. Watercolor, marker, and crayon can lose color over time. Pick a wall away from strong sunlight.
Not Dating the Artwork
Write the child’s name, age, and date on the back. Years later, this small detail becomes very meaningful.
Avoid placing original children’s artwork in direct sunlight, damp rooms, or very hot spaces. Paper can fade, curl, or become brittle. For special pieces, use a protective frame or store the original flat.
Before You Buy: Checklist
- Measure the artwork sizes your child usually makes.
- Decide whether you want permanent display or easy rotation.
- Choose one frame color or wood tone.
- Check if the display is safe for children and pets.
- Pick a wall away from direct sunlight.
- Plan storage for artwork that is not on display.
Shop This Look
How to Store the Artwork You Do Not Display
Not every piece needs to go on the wall. That does not mean it is not loved.
I like a simple three-part system: display, save, and photograph. Display the strongest pieces. Save the most meaningful ones. Photograph the rest before recycling or rotating.
If your child is attached to many pieces, let them help choose the display. This makes the process feel respectful, not like you are secretly throwing their work away.
For inspiration on thoughtful home objects and creative styling, you may also enjoy our Books & Gifts section and gift guide for art lovers.
Quick Recap
- Use one clear display zone to avoid visual clutter.
- Choose matching frames, art ledges, or front-opening frames.
- Rotate artwork monthly or seasonally.
- Store special pieces flat and away from sun or moisture.
- Keep the display simple so the artwork can shine.
To display children’s artwork in a stylish home, combine playful art with calm presentation. Use clean frames, simple spacing, and a rotation plan. This keeps the home beautiful while honoring your child’s creativity.
Frequently Asked Questions
Choose one display area, limit the number of pieces, and rotate artwork often. Matching frames or art ledges help the display feel neat.
Front-opening frames are best for frequent rotation. Traditional frames with mats are best for special pieces you want to keep long term.
Monthly rotation works well for most families. You can also rotate by season, school term, or special project.
Use simple matching frames, white mats, and even spacing. Keep the display small so it feels curated rather than crowded.
No. Keep the most meaningful pieces, display favorites, and photograph the rest. This keeps memories without creating too much storage.
Yes. Marker, crayon, paint, and paper can fade or yellow in direct sunlight. Place special artwork away from strong sun.
Yes. Art ledges are flexible and stylish. They make it easy to swap framed drawings without making new holes in the wall.
Conclusion
Learning how to display children’s artwork in a stylish home is really about balance. You want the home to feel calm, but you also want it to feel personal and loved.
My best recommendation is simple: choose one display zone, use clean frames or a picture ledge, and rotate the artwork often. Keep special pieces safe, photograph bulky projects, and let your child be part of the process.
When you treat children’s artwork with care, it becomes more than paper on a wall. It becomes part of your family story, and that is one of the most beautiful things a home can hold.