How High to Hang a Picture Ledge: Exact Height Guide

For most rooms, position a picture ledge so the visual center of the finished display sits about 57 to 60 inches from the floor. Above a sofa or headboard, start about 8 to 12 inches above the furniture. Above a console or sideboard, begin with roughly 8 to 14 inches of space.
Knowing how high to hang a picture ledge can make the difference between a display that feels thoughtfully composed and one that seems disconnected from the room.
The best height depends on more than one standard measurement. Your furniture, frame size, ceiling height, viewing distance, and the number of ledges all influence where the shelf should sit.
This guide gives you practical starting measurements for sofas, beds, console tables, hallways, and stacked ledges. It also explains how to adjust those measurements so your final display feels balanced in your specific room.
Picture Ledge Height at a Glance
| Location | Recommended Starting Point |
|---|---|
| Open wall | Center the completed display 57–60 inches from the floor |
| Above a sofa | Place the ledge 8–12 inches above the sofa back |
| Above a headboard | Leave approximately 8–12 inches above the headboard |
| Above a console | Begin with 8–14 inches above the furniture |
| Hallway wall | Keep the display center close to 57–60 inches |
| Two stacked ledges | Allow approximately 12–18 inches between the ledges |
| Children’s room | Position lower for viewing but secure it carefully |
The 57-to-60-inch guideline refers to the visual center of the complete arrangement, not necessarily the ledge itself. Tall frames require the shelf to sit lower than small frames.
How High Should a Picture Ledge Be From the Floor?
On an open wall without furniture, aim to place the visual center of the completed display approximately 57 to 60 inches from the floor.
Do not automatically install the shelf itself at that height. The ledge supports artwork that extends upward, so its exact position depends on the height of the main frame.
Suppose your preferred display center is 58 inches from the floor and your main frame is 20 inches tall:
This calculation is approximate because frames normally lean slightly against the wall. Mats, layered frames, and overlapping pieces can also shift the visual center.
Mark the proposed shelf line with painter’s tape. View it from the doorway, seating area, and across the room before making any holes.
How High to Hang a Picture Ledge Above a Sofa
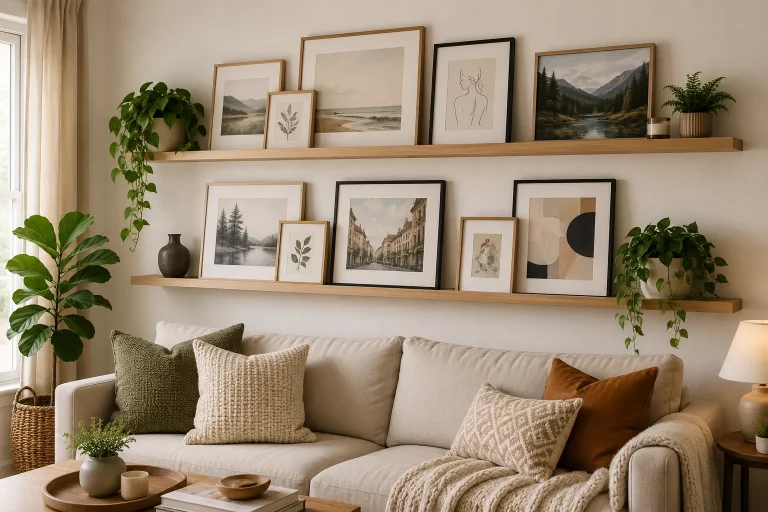
A picture ledge above a sofa should feel visually connected to the seating area. If it sits too high, the shelf and furniture can look like unrelated elements.
Start by placing the bottom of the ledge approximately 8 to 12 inches above the sofa back.
- The sofa has a tall back.
- Your frames are relatively small.
- The room has a lower ceiling.
- You want a cozy, collected look.
- The sofa has a low profile.
- Your main frames are tall.
- The room has high ceilings.
- Loose cushions extend above the sofa back.
The ledge should also relate to the width of the sofa. A practical starting point is to make the ledge, or combined ledge arrangement, approximately two-thirds the width of the sofa.
For example, above an 84-inch sofa, a total ledge width of approximately 56 to 63 inches will usually feel more balanced than one short 24-inch shelf.
Center the ledge over the sofa rather than the entire wall. This matters when the sofa is not positioned exactly in the middle of the room.
How High to Hang a Picture Ledge Above a Bed
For a picture ledge above a headboard, begin with approximately 8 to 12 inches of space between the headboard and the bottom of the ledge.
A lower arrangement can make a bedroom feel softer and more intimate. However, safety is especially important when the shelf sits directly above a sleeping area.
Avoid displaying unsecured glass frames, heavy books, large ceramics, or breakable objects directly above a bed. Use suitable wall anchors, follow the ledge’s weight limit, and favor lightweight pieces.
For a calm bedroom arrangement, consider using:
- One wide landscape print
- Two or three lightweight frames
- Soft or coordinated colors
- One small, unbreakable decorative object
- Visible open space between pieces
Avoid filling the entire shelf. A bedroom ledge often feels more restful when the arrangement has room to breathe.
How High to Hang a Picture Ledge Above a Console Table
Above a console table or sideboard, start with approximately 8 to 14 inches between the top of the furniture and the bottom of the ledge.
The right spacing depends on the objects placed on the console. Tall table lamps, vases, candles, or stacked books may require a slightly higher shelf.
Treat the console and picture ledge as one complete arrangement. For example, a lamp on one side of the console can balance a tall frame on the opposite side of the shelf.
Style the console first. Then mark the ledge position with painter’s tape so you can judge its relationship to the tallest lamp, vase, or decorative object.
How High to Hang a Picture Ledge in a Hallway
A hallway display is viewed while people are moving rather than sitting still. The arrangement should be easy to notice without projecting too far into the walking area.
For a standard hallway, keep the center of the complete display around 57 to 60 inches from the floor.
You can move it slightly higher in a particularly narrow hallway if you are concerned about people brushing against the frames.
Use coordinated family photographs, travel prints, postcards, botanical illustrations, or small sketches to create a display that unfolds as people walk through the space.
Keep the objects shallow and stable. Deep ornaments, projecting frames, and fragile ceramics may become hazards in a narrow passage.
How Far Apart Should Two Picture Ledges Be?
For two stacked picture ledges, start with approximately 12 to 18 inches of vertical space between them.
The required distance depends on the height of the frames placed on the lower ledge. Tall frames need more space than small photographs or postcards.
Place the intended frames on the floor in the same layered arrangement you plan to create on the wall.
Measure from the bottom of the frame to its highest point.
Add approximately two to four inches above the tallest frame.
Use the combined measurement to establish the position of the second ledge.
Apply painter’s tape across the wall and inspect the spacing before drilling.
For small prints, 12 inches may be enough. Taller artwork may require 16 to 20 inches of spacing.
Choose the Height Based on Your Main Frame
The artwork usually determines the final visual height more than the shelf itself.
Before drilling, choose the main frame that will anchor the arrangement. The largest piece will normally control how high or low the complete display appears.
- One large anchor frame at the back
- One or two medium frames layered in front
- One small print, card, or photograph
- One simple decorative object
- At least one visible area of empty shelf
Place the largest frame first, then calculate the shelf height around the center of that piece.
For more arrangement ideas, read our guide to styling picture ledges for a layered art display.
A Practical Picture Ledge for Small Displays

Before ordering a picture ledge, measure the available wall width and compare the shelf depth with your thickest frame.
For more sizing guidance, see how deep a picture ledge should be for framed art.
Low, Medium, or High Picture Ledge Placement?
The position of a picture ledge changes the visual mood of the wall. Low placement feels intimate, medium placement feels adaptable, and high placement can add architectural impact.
Low Placement
A lower picture ledge feels comfortable, personal, and easy to interact with. It works especially well in bedrooms, reading corners, compact living rooms, and spaces with low furniture.
Low placement also makes it easier to rotate prints and rearrange small objects. However, leave enough space above the furniture so the shelf does not feel compressed.
Medium Placement
Medium placement is the most versatile option for many homes. It can work in living rooms, dining spaces, hallways, bedrooms, and home offices.
If you are uncertain, begin with the center of the display around 57 to 60 inches from the floor. Adjust it after testing the shelf line with tape.
High Placement
A higher picture ledge draws the eye upward and can make a tall wall feel more architectural.
It may work well in:
- Rooms with high ceilings
- Large open-plan spaces
- Stair landings
- Formal living rooms
- Large feature walls
Do not raise the ledge only because the ceiling is high. The shelf should still relate to the furniture and remain comfortable to view from the room’s main seating or standing position.
Picture Ledge Height for Different Frame Sizes
| Main Frame Height | Approximate Ledge Height for a 58-Inch Display Center |
|---|---|
| 10 inches | Approximately 53 inches from the floor |
| 12 inches | Approximately 52 inches from the floor |
| 16 inches | Approximately 50 inches from the floor |
| 20 inches | Approximately 48 inches from the floor |
| 24 inches | Approximately 46 inches from the floor |
| 30 inches | Approximately 43 inches from the floor |
These figures are approximate. Leaning angles, frame mats, layered artwork, and overlapping pieces can change the perceived center of the display.
Common Picture Ledge Height Mistakes
- Calculate the height using the largest frame.
- Center the ledge over the furniture below.
- Test the position with painter’s tape.
- View the shelf while sitting and standing.
- Leave visible space between display pieces.
- Hanging the shelf close to the ceiling.
- Measuring the ledge without considering the frames.
- Leaving a large gap above the sofa or bed.
- Using a very short ledge above wide furniture.
- Overloading the shelf with small objects.
Hanging the Ledge Too High
This is one of the most common mistakes. A shelf may look acceptable while you are standing close to the wall but feel disconnected when viewed from a sofa or doorway.
Judge the position from the place where you will see the arrangement most often.
Ignoring the Height of the Frames
The ledge may sit near eye level while the artwork extends far above it. Always calculate the placement using the finished display, especially its largest frame.
Centering the Ledge on the Wall
When the shelf sits above furniture, center it over that furniture rather than automatically centering it on the wall.
Leaving Too Much Empty Space
A large gap between the shelf and the furniture can cause the ledge to look as though it is floating. Keep the two elements close enough to create one connected composition.
Using a Ledge That Is Too Short
A small shelf above a wide sofa may look accidental or visually weak. Choose a longer shelf or combine two matching ledges to create greater width.
Overcrowding the Shelf
Too many objects can make the ledge look like storage rather than a curated display. Use fewer pieces, vary their sizes, and leave some sections open.
Read our guide on arranging frames on a picture ledge without clutter for more styling ideas.
What You Need Before Installation
How to Measure and Install a Picture Ledge
Record the wall width, furniture width, furniture height, main frame height, intended ledge length, and normal viewing distance.
Arrange the frames and objects as they will appear on the shelf. Measure the full height of the completed display.
For an open wall, use a display center of approximately 57 to 60 inches. Above furniture, begin with the recommended spacing range.
Place tape across the wall where the ledge will sit. View the line while sitting, standing, and entering the room.
Locate studs and check for possible pipes or electrical wiring before drilling.
Use a spirit or laser level to create a straight horizontal guide across the mounting area.
Follow the manufacturer’s instructions and use anchors designed for your wall type and expected load.
Begin with lightweight frames. Check for movement before adding heavier pieces.
A Helpful Tool for Keeping the Ledge Straight

A standard spirit level may be sufficient for one short shelf. A laser level becomes more useful when the ledge is long, when two ledges must align, or when the arrangement extends across a large wall.
How to Style the Ledge After Installation
Once the ledge is secure, begin with the largest piece. Place it slightly off-center rather than automatically positioning it in the middle.
Add one or two medium frames in front with a small amount of overlap. Then use a smaller print or object to guide the eye across the shelf.
Avoid creating identical groups at both ends. Slight variation normally looks more natural and collected.
Consider Lighting Before Choosing the Final Height
Lighting affects how the artwork appears and can change the perceived height of the entire display.
Avoid placing delicate prints in prolonged direct sunlight. Paper, photographs, and some pigments may fade over time.
If your frames contain glass, check for reflections throughout the day. A picture ledge positioned opposite a bright window may experience distracting glare.
Keep artwork and shelf finishes away from excessive heat produced by fireplaces, radiators, heating vents, and hot lamps.
Inspect the wall in the morning, afternoon, and evening before choosing the final position.
Picture Ledge Safety Tips
- Use wall anchors suitable for the wall material.
- Follow the manufacturer’s stated weight limit.
- Avoid heavy objects above beds, cribs, or sofas.
- Keep fragile objects away from the shelf edge.
- Use non-slip pads under frames when needed.
- Check the ledge regularly for loose hardware.
- Avoid deep objects in narrow hallways.
- Consider acrylic instead of glass in higher-risk areas.
Renters may prefer removable options for very lightweight displays. Before choosing an adhesive solution, read our guide on how to hang a picture ledge without nails.
Picture Ledge or Individually Hung Frames?
A picture ledge is often the better option when you enjoy changing your artwork. Frames can be moved, layered, and replaced without creating new holes for each arrangement.
Individually hung frames may be more suitable when you want a permanent gallery layout with a flatter and more formal appearance.
- You change artwork frequently.
- You enjoy layered frame arrangements.
- You want to mix art with books or objects.
- You prefer flexible seasonal displays.
- You want fewer individual frame holes.
- You want a permanent arrangement.
- You prefer a formal gallery look.
- You need minimal projection from the wall.
- You do not want a visible shelf line.
- You prefer less dusting and restyling.
Our guide comparing picture ledge shelves and individually hung frames can help you choose the most suitable option.
Final Recommendation
For an open wall, position the ledge so the center of the finished display sits approximately 57 to 60 inches from the floor. Above a sofa or headboard, begin about 8 to 12 inches above the furniture. Above a console, start with 8 to 14 inches and adjust for lamps or decorative objects.
Most importantly, calculate the position using your largest frame rather than the ledge alone.
Mark the proposed shelf line with painter’s tape, view it from the room’s main seating and standing positions, and make any adjustments before drilling.
The right height should make the picture ledge feel connected to the room, comfortable to view, and balanced with the furniture and artwork around it.
- Use 57 to 60 inches as the starting display-center height.
- Leave 8 to 12 inches above sofas and headboards.
- Leave 8 to 14 inches above console tables or sideboards.
- Allow approximately 12 to 18 inches between stacked ledges.
- Adjust every measurement for the height of your largest frame.
- Test the proposed position with painter’s tape before drilling.
Frequently Asked Questions
Position it so the center of the complete art display sits approximately 57 to 60 inches from the floor. The ledge itself will normally sit lower, depending on the height of your frames.
Start with the bottom of the ledge approximately 8 to 12 inches above the sofa back. Adjust the measurement for the sofa profile and the height of your artwork.
The visual center of the artwork should be close to eye level. The ledge itself does not need to sit at eye level because the frames extend above it.
Allow approximately 12 to 18 inches between the ledges. Increase the distance when displaying tall frames on the lower shelf.
Begin about 8 to 12 inches above the headboard. Use lightweight objects and secure the shelf carefully because it is positioned above a sleeping area.
A ledge or combined shelf arrangement measuring approximately two-thirds the width of the sofa is a useful starting point.
Yes. Tall ceilings, large frames, stairways, and architectural walls may suit a higher arrangement. The display should still feel connected to nearby furniture and remain comfortable to view.
View it while seated and from the room entrance. If the display appears detached from the furniture or leaves an unusually large empty gap, it is probably too high.
Yes. Choose a shallow ledge, keep the displayed objects stable, and position everything where people will not brush against the shelf while walking past.
One ledge creates a cleaner and simpler arrangement. Two ledges provide more display space and visual impact but require careful spacing and alignment.