How to Take Good Pictures with Led Lights

Use one softened LED light at a 45-degree angle, then adjust brightness and color temperature to match your subject and room. Better placement, diffusion, and white balance usually matter more than buying more lights.
Learning how to take good pictures with led lights starts with a simple idea: control the light before you worry about the camera. LED lights make that easier because you can see shadows, brightness, and color in real time, whether you are shooting portraits, products, food, or a styled corner of a room.
For most home setups, the goal is not to flood everything with light. It is to create shape, keep color believable, and make the subject stand out from the background. A modest LED kit can do that well if you choose the right fixture, place it carefully, and match it to the room instead of fighting every existing light source.
- Start simple: One main LED light is enough for most beginner setups.
- Soften the source: Diffusion reduces harsh shadows, glare, and uneven skin texture.
- Match the room: Choose a color temperature that works with daylight or existing lamps.
- Watch reflections: Move lights off-axis for glass, metal, and glossy products.
- Buy for control: Prioritize dimming, stable output, and accurate color over gimmicky effects.
How to Take Good Pictures With LED Lights: The Core Setup That Works
A reliable LED photo setup is surprisingly straightforward. Start with one main light, soften it if possible, and build from there only when the image needs more separation or shadow control. This approach works for phones, mirrorless cameras, and compact home studios because it keeps the scene manageable.
Start with one main light, soften it, and place it at a 45-degree angle
If you are unsure where to begin, place your main LED light slightly above eye level and about 45 degrees to one side of the subject. That angle creates shape on faces, adds dimension to objects, and avoids the flat look that happens when a light is placed directly in front.
Softening matters just as much as position. A bare LED panel or bulb can produce sharp shadows, shiny hotspots, and unflattering texture. Diffusion cloth, a softbox, a translucent panel, or even a white shower curtain-style diffuser designed for lighting can spread the beam and make the transition from light to shadow look smoother.
The distance between light and subject also changes the result. Closer light tends to look softer and more wrapped, while a light placed farther away looks harder and more directional. If a portrait feels harsh, try making the light larger relative to the subject by moving a diffused source closer rather than simply dimming it.
Turn off extra lamps if possible and position one LED at a 45-degree angle to establish the main look.
Use diffusion or bounce to reduce harshness, then evaluate the shadows before changing anything else.
If shadows are too deep or the subject blends into the background, add a controlled second light rather than increasing overall brightness.
Match brightness and color temperature to your subject and room
Brightness should fit both the subject and the room. A reflective product on a tabletop usually needs less direct intensity than a person standing several feet from the light. A large room scene may need broader, more even illumination than a close-up portrait.
Color temperature matters because LED lights do not exist in isolation. If your room already has warm practical lamps, a very cool daylight LED can make the scene feel mixed and unnatural. If you are shooting near a window, a neutral or daylight-balanced setting often blends more naturally with ambient light.
When available, use your light’s dimmer and color controls instead of moving immediately to camera settings. It is often easier to get a natural result by adjusting the light first, then fine-tuning exposure and white balance in-camera.
Control shadows, reflections, and background separation from the beginning
Good LED photography is often about subtraction. Before adding more fixtures, look for the main issue: are shadows too dark, are reflections distracting, or does the subject disappear into the background?
Shadows can be opened with a reflector, a white wall, or a second dimmer fill light. Reflections on glass, glossy packaging, metal, and framed art usually improve when you move the light off-axis rather than aiming it straight on. Background separation often comes from distance: pull the subject away from the wall and let the light fall off naturally.
If you photograph framed prints or wall art at home, be especially careful with glare. A small shift in angle can make a larger difference than a stronger light, and if you are concerned about preservation around displayed pieces, Hurrell Editions also has a guide on whether LED lights fade pictures.
What to Look for in LED Lights for Better Photos in 2026
Not every LED light is equally useful for photography. Some are built for ambiance, some for video calls, and some for more controlled image-making. In 2026, the strongest options for still photography usually combine stable output, flexible power, and believable color.
Brightness output, dimming range, and consistency
Look for lights that can dim smoothly across a useful range. A fixture that only looks good at full power is harder to use in small rooms, especially for portraits and tabletop scenes. Consistency also matters: the light should not shift dramatically in color or flicker as you lower brightness.
Manufacturer listings may describe output in different ways, so compare carefully. Some emphasize wattage, others lux at a given distance, and others market the light more generally. If exact output data is unclear, it is safest to compare fixture size, intended use, and official specifications rather than assuming two lights with similar marketing claims perform the same.
Color temperature, CRI/TLCI, and accurate skin tones
For photography, color quality is often more important than flashy effects. Adjustable color temperature helps you blend with daylight or warm room lamps, while higher CRI or TLCI figures are commonly used by manufacturers to indicate color accuracy. These ratings are worth checking on the official listing, especially if you photograph people, fabrics, art prints, or products where subtle tones matter.
Skin tones are often the easiest place to notice weak color rendering. If faces look gray, greenish, or oddly magenta even after white balance correction, the fixture may be the limitation rather than your camera.
CRI and TLCI claims vary by model, and not every retailer lists them clearly. When color accuracy matters, confirm the manufacturer’s own specifications before buying.
Panel lights, tubes, bulbs, ring lights, and small RGB fixtures
Different fixture types suit different jobs. LED panels are practical all-rounders for portraits, products, and small room scenes. Tube lights are useful for edge light, accent light, and fitting into narrow spaces. LED bulbs can work well inside softboxes or practical lamps if the fixture supports them safely.
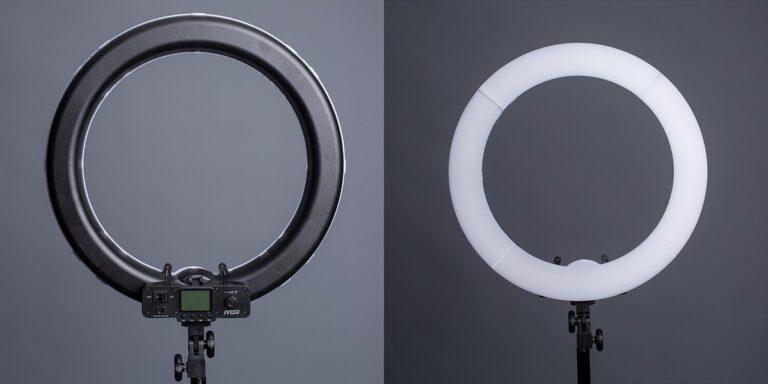
Ring lights can be flattering for simple beauty shots and direct-to-camera content, but they often create a flat look for more dimensional portraits. Small RGB fixtures are helpful for background accents or creative color, though they are not always the best primary light if your main goal is natural-looking still photography.
| Option | Best For | Key Consideration |
|---|---|---|
| LED panel | General portraits, products, room scenes | Works best with diffusion or bounce |
| Tube light | Accent light, edge light, tight spaces | Can look stylized if used as the only source |
| LED bulb in modifier | Soft, broad light on a budget | Check fixture compatibility and heat guidance |
| Ring light | Beauty content, simple talking-head setups | Often flattens texture and shape |
| Small RGB light | Creative backgrounds and separation | Usually better as a secondary light |
Power source options: battery, USB-C, mains power, and portable kits
Your power setup affects convenience more than many buyers expect. Battery-powered lights are useful for flexible room-to-room shooting and spaces without nearby outlets. USB-C charging can be especially convenient for smaller fixtures and travel kits, while mains-powered lights are often better for longer sessions.
If you are considering portable or battery-based options, it helps to verify charging time and runtime before buying. Related Hurrell Editions guides on whether battery picture lights need to be charged and how long battery-operated picture lights last offer useful context on power expectations for compact lighting products.
How to Place LED Lights for Portraits, Products, Food, and Room Scenes
Placement changes with the subject, but the principle stays the same: light for shape first, then refine for texture, mood, and realism.
Portrait lighting placement for flattering faces and catchlights
For portraits, place the main light slightly above eye level and angled down gently. This usually creates a natural shadow under the nose and chin without making the eyes look dark. Catchlights should appear in the upper part of the eyes, which helps the portrait feel alive.
If the face looks too dramatic, add a reflector or white foam board on the shadow side. If the face looks too flat, move the fill farther away or reduce it. Small changes matter more than adding multiple lights immediately.
Product and flat-lay placement to reduce glare and hard reflections
Products with glass, glossy labels, ceramics, metal, or polished packaging reflect LED sources very easily. Instead of aiming the light directly at the object, try lighting through diffusion from the side or above, then use white cards to bounce light back where needed.
For flat lays, a broad soft source placed above and slightly to one side usually gives better depth than a centered overhead light. If packaging still reflects too strongly, raise the light, increase diffusion, or alter the camera angle a few degrees.
Food photography angles that add texture without harsh shadows
Food often looks best with side light or back-side light because it reveals texture in crusts, greens, steam, sauces, and glassware. Front lighting can make dishes look dull and two-dimensional, especially on matte plates or neutral linens.
Use a soft source and keep fill gentle. You want enough contrast to show texture, but not so much that herbs, crumbs, or table details disappear into heavy shadow.
Interior and lifestyle shots: lighting a wider room naturally
Room scenes are harder because you are balancing multiple surfaces, practical lamps, windows, and a larger area. A single small LED often looks obvious in a wide shot, so use it to support the room rather than overpower it. Bounce it into a wall or ceiling where possible, or use it to lift a darker corner while letting window light remain the main source.
If you are building a dedicated corner for creative work, a thoughtful room layout matters as much as the lights themselves. For a broader planning approach, see Hurrell Editions’ guide on how to set up a home art studio space.
Choosing the Right Brightness and Color Temperature for Clean, Natural Images
Brightness and color temperature shape the mood of the image, but they also affect how easy the photo is to edit later. A scene that looks balanced in person is usually easier to correct than one built from conflicting light sources.
Warm, neutral, and daylight settings: when each one works best
Warm settings often suit cozy interiors, evening lifestyle shots, wood tones, and candle-adjacent scenes. Neutral settings are a good middle ground for mixed interiors and general product work. Daylight settings are often useful near windows, for crisp editorial looks, and for subjects where you want cleaner whites and cooler contrast.
None of these settings is automatically right. The best choice depends on the room, the subject, and whether you want the image to feel cozy, true-to-life, or bright and airy.
Balancing LED lights with window light and practical lamps
Mixed lighting is one of the biggest reasons home photos look inconsistent. If daylight is entering the room strongly from one side, either match your LED closer to that color or reduce the daylight influence with curtains or timing. If warm lamps are visible in frame, decide whether they are decorative accents or part of the actual exposure.
Practical lamps can add atmosphere, but they can also create orange patches that clash with a cool key light. A cleaner image usually comes from choosing one dominant color family and letting the rest support it subtly.
How white balance affects mood, realism, and editing flexibility
White balance is not just a correction tool. It is a creative control that affects whether skin looks healthy, walls look clean, and product colors appear trustworthy. If your camera allows a custom white balance or Kelvin adjustment, use it when the scene is stable.
Shooting too warm can make whites look dingy; shooting too cool can make interiors feel sterile. A balanced file also gives you more editing flexibility later, especially if you are photographing items for sale, portfolio work, or design documentation.
- Set one dominant light source before turning on decorative lamps.
- Use a gray, white, or neutral object in the scene to judge color more accurately.
- If skin or white walls look strange, correct the light mix before relying on editing.
Styling Ideas That Make LED-Lit Photos Look More Expensive
Expensive-looking images rarely come from brightness alone. They come from controlled contrast, considered backgrounds, and a lighting style that suits the subject instead of overwhelming it.
Using diffusion, bounce, and negative fill for depth
Diffusion softens the source, bounce opens shadows, and negative fill adds shape by deepening shadow areas in a controlled way. Negative fill can be as simple as placing a black board or dark fabric on the shadow side of the subject to stop light from spilling everywhere.
This is especially useful in pale rooms where white walls bounce light back into every angle. Without some control, the image can become bright but lifeless.
Background choices, props, and textures that suit modern interiors
Simple backgrounds usually photograph best under LED light: matte walls, linen, wood, stone-like surfaces, ceramic pieces, and soft textiles. Glossy backgrounds, mirrored props, and highly reflective tabletops can work, but they require more careful placement and diffusion.
Try to keep the palette tight. A few intentional textures often look more refined than many competing props. The subject should still read clearly at a glance.
Matching the lighting style to the room, subject, and existing decor
A moody side-lit portrait may suit a dark-toned room, while a brighter bounced setup may fit a light, modern kitchen. Product images for handmade goods often benefit from softer, more tactile lighting than sleek electronics or glassware.
The best-looking photos usually feel like the light belongs in the space. If the LED setup feels obvious, the styling and placement probably need more refinement.
Common LED Lighting Mistakes That Ruin Photos
Many disappointing images come from a few predictable mistakes. The good news is that they are usually easy to fix once you know what to look for.
Overlighting the scene and flattening detail
Too much light from too many directions removes depth. Faces lose contour, products lose shape, and room scenes start to look clinical. Instead of adding more brightness, ask whether the issue is really placement, diffusion, or background separation.
Mixing clashing color temperatures without intention
Cool LED light, warm ceiling bulbs, and daylight from a window can all fight each other in one frame. That mix can be used creatively, but when it happens by accident, skin tones and whites often suffer first.
Placing lights too close, too high, or directly front-on
A light that is too close can create hotspots and uneven falloff. A light that is too high can hollow out eyes and exaggerate shadows. A light placed directly in front often removes shape and makes reflective surfaces harder to manage.
Ignoring flicker, reflections, and uneven skin tones
Some LED fixtures may flicker under certain settings or when paired with particular shutter speeds. Reflections can reveal the shape of the light source in glasses, frames, bottles, or glossy packaging. Uneven skin tones can point to poor color rendering, mixed light, or a white balance mismatch.
When troubleshooting, change one variable at a time. Move the light, then reassess. Add diffusion, then reassess. That method is faster than changing everything at once.
- Use one main light and refine it before adding more fixtures.
- Match color temperature to the room’s dominant light source.
- Check reflections on glass, metal, and glossy packaging before shooting a full set.
- Blasting the scene with maximum brightness.
- Using a front-on light for every subject.
- Assuming editing will fully fix bad light color or glare.
Safety, Care, and Maintenance for LED Photography Lights
LED lights are generally practical for home use, but safe setup still matters. Stability, cable management, and basic care can prevent damaged gear and avoidable accidents.
Safe placement around fabrics, walls, children, and pets
Keep lights on stable stands or secure supports, and make sure modifiers, diffusion, and fabrics are placed according to the manufacturer’s safety guidance. In homes with children or pets, avoid leaving lightweight stands unattended in walkways or near play areas.
Even compact fixtures should have airflow and should not be pressed tightly into soft furnishings, bedding, or drapery unless the manufacturer explicitly allows that setup.
Cable management, stands, clamps, and power basics
Route cables where people will not trip over them, and avoid overloading outlets or using damaged power accessories. Stands and clamps should suit the weight and shape of the fixture. If a light is meant for a desk mount, do not assume a light-duty clip is safe on every shelf or headboard.
Cleaning diffusers, storing batteries, and protecting LEDs in transit
Dust on diffusers and panels can affect output and create a neglected look in close workspaces. Clean surfaces gently according to the maker’s care instructions. Batteries should be stored and charged as recommended by the manufacturer, especially if the light will sit unused for long periods.
If you move your kit between rooms or locations, padded storage helps protect LEDs, mounts, and diffusion accessories from knocks and scratches.
Always confirm the official instructions for charging, battery storage, mounting accessories, and safe operating conditions before buying or setting up a light.
Are LED Lights Worth It for Better Photography? Benefits, Limitations, and Final Recommendation
For many people, yes. LED lights are one of the most practical ways to improve photos at home because they let you see the result as you work, fit into small spaces, and scale from simple portraits to product and interior scenes.
Who LED lights suit best: beginners, content creators, small brands, and home stylists
LED lights suit beginners because they make cause and effect visible. They also suit content creators, small shop owners, artists documenting work, and home stylists who need repeatable results without learning flash first.
Where they work best: bedrooms, living rooms, studios, kitchens, and compact spaces
They are especially useful in compact rooms where window light is inconsistent or only available at certain times of day. Bedrooms, living rooms, kitchens, and small studio corners can all benefit from a portable LED setup with dimming and color control.
Key trade-offs versus flash, daylight, and cheaper ambient lighting
Flash can offer more power and motion-freezing ability. Daylight can look beautiful and costs nothing, but it changes constantly. Cheap ambient lights may seem convenient, yet they often lack dimming precision, color consistency, and the control needed for reliable photo work.
A practical 2026 buying recommendation for different budgets and goals
If you want the safest general recommendation, start with one adjustable bi-color LED panel or compact COB-style light, a way to diffuse it, and a simple reflector. That setup is flexible enough for portraits, products, food, and room details without locking you into a highly specialized system.
For tighter budgets, prioritize color quality and diffusion over extra effects. For growing setups, add a second light only after the first one is doing its job well. Before purchasing, confirm official specs for output, color controls, power method, charging details, and included accessories, since these vary widely by model and retailer.
- Start with one softened key light at roughly a 45-degree angle.
- Match brightness and color temperature to the room, subject, and mood.
- Use diffusion, bounce, and positioning to manage shadows and reflections.
- Choose LED lights for consistent output, accurate color, and practical power options.
- For most people, one good adjustable LED plus diffusion is a smarter buy than several cheap lights.
Frequently Asked Questions