
How to Build a Small Writing Desk Step by Step

Build a small writing desk by choosing a simple four-leg frame with aprons, sizing it to your room, and using stable materials that suit your finish. For most compact home offices, a desk around 42 to 48 inches wide with careful assembly and a durable finish is the most practical option.
Learning how to build a small writing desk is usually easier than people expect when the design stays simple, the dimensions fit the room, and the materials match the way the desk will actually be used. For most home offices, the most practical route is a compact four-leg desk with a sturdy apron frame, a top around 36 to 48 inches wide, and a finish that can handle everyday writing, laptop work, and light styling.
A small writing desk is one of the best DIY furniture projects for a compact home office because it solves a very specific problem: you need a proper work surface without the visual bulk of a full workstation. The key is not making the desk more complicated than the room requires. A clean frame, a proportionate top, and stable joinery will usually outperform a fancier design that adds shelves, drawers, or hardware before the base build is sound.
- Best size: Most small writing desks work well at 36 to 48 inches wide and 18.
- Easiest build: A four-leg frame-and-top design is simpler and more stable than drawer-heavy or floating styles.
- Best materials: Plywood is beginner-friendly, solid wood is classic, and MDF is mainly useful for painted.
- Main priority: Focus on squareness, legroom, and top attachment before worrying about decorative details.
- Worth building: DIY makes the most sense when you need custom sizing, better proportions, or a.
How to Build a Small Writing Desk Step by Step: The Best Approach for 2026 Homes
The best approach for current homes is to build for flexibility. Many people now need a desk that works in a bedroom corner, living room alcove, hallway niche, or shared creative space, so compact dimensions and restrained styling matter as much as strength.
That means starting with a desk that is narrow enough to fit small rooms but deep enough to be useful. It should hold a laptop, notebook, lamp, and a few essentials without feeling cramped. It also needs enough knee clearance to sit comfortably for an hour or two, even if it is not meant to replace a large ergonomic office setup.
Choose the right size, material, and build style before you cut anything
Before buying boards or drawing a cut list, decide three things: where the desk will go, what it needs to hold, and how polished you want the final look to be. Those choices determine almost everything else.
If the desk is for occasional writing, bill paying, journaling, or laptop use, a lighter build is usually enough. If it will support a monitor arm, stacked books, or art tools, choose a thicker top and stronger joinery. Plywood with solid wood edging is often the most forgiving option for beginners because it stays flatter than many low-cost solid boards.
Use a simple frame-and-top design for the easiest, most reliable result
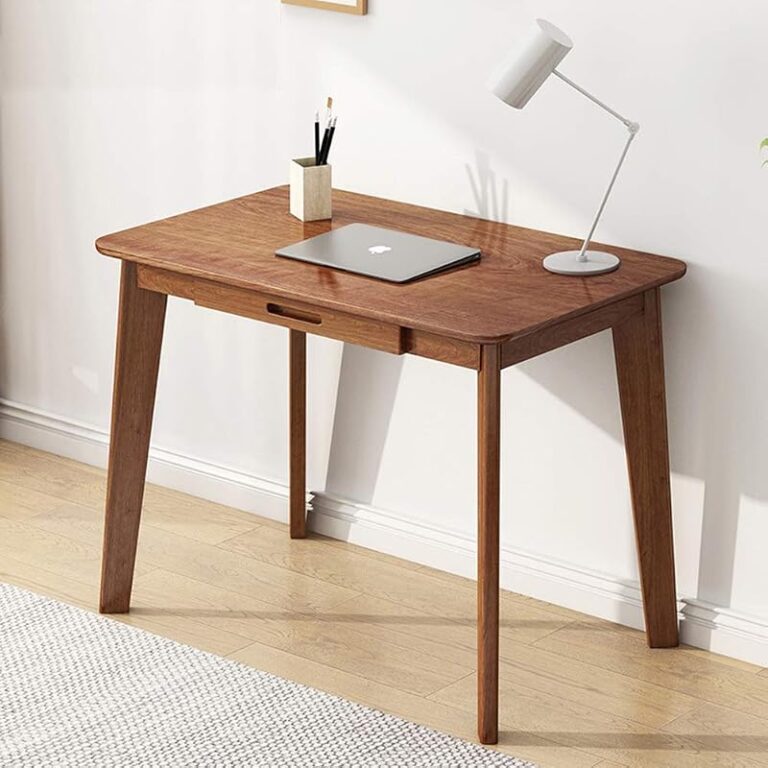
The easiest reliable design is a rectangular top attached to a four-leg base with aprons on all sides. This structure is simple, stable, and visually light. It also gives beginners more room for error than floating designs, hairpin-leg builds with thin tops, or drawer-heavy builds that require precise alignment.
A basic frame-and-top desk can be made from solid wood, plywood, or a mix of both. The aprons stiffen the base, reduce wobble, and create a clean shadow line under the top. If you want a desk that feels refined rather than homemade, this is the build style to start with.
Plan the Desk First: Ideal Dimensions, Placement, and Who This Build Suits

Desk planning diagram shows dimensions, placement, and intended user notes.
Planning is what separates a desk that merely fits from one that works well every day. Even a small project benefits from careful measuring because compact rooms leave little margin for awkward depth, blocked walkways, or chair clearance problems.
Standard small writing desk sizes for compact home offices, bedrooms, and alcoves
Most small writing desks fall into a practical range of about 36 to 48 inches wide and 18 to 24 inches deep. Height is commonly around 29 to 30 inches, which suits standard dining-style and desk chairs.
For very tight spaces, 36 by 18 inches can work, especially for a laptop-only setup. If you want room for a notebook beside a laptop or a small task lamp, 42 to 48 inches wide and 20 to 24 inches deep is usually more comfortable. The wider end of that range tends to feel more balanced in an adult home office rather than temporary or undersized.
How much legroom, surface depth, and clearance you actually need
Legroom matters more than many first-time builders expect. Aim for enough clear space between the legs and aprons so your knees do not hit the structure when you sit naturally. A shallow apron can help preserve comfort while still stiffening the frame.
Depth also affects usability. Eighteen inches is workable for writing and light laptop use, but it can feel tight if you add a lamp, monitor riser, or trays. Twenty to twenty-two inches is often the sweet spot for small rooms because it gives you usable surface area without pulling too far into the space.
Mark the desk footprint on the floor with painter’s tape before you build. It is the quickest way to judge walkway clearance, chair pull-back space, and whether the depth feels too dominant in the room.
When a DIY small writing desk makes sense over buying ready-made
Building your own desk makes the most sense when ready-made options are either the wrong size, the wrong finish, or too flimsy for the price. DIY is also appealing when you need a custom width for an alcove, want to match existing trim or wood tones, or prefer a more furniture-like look than flat-pack pieces often provide.
Buying ready-made may be the better route if you need built-in cable routing, locking drawers, sit-stand adjustment, or a very fast solution. But if your goal is a compact, timeless desk with straightforward function, a simple handmade build can offer better proportions and material quality for the money.
What to Look for Before You Build: Materials, Tools, Stability, and Finish Quality
Good desk builds depend less on advanced woodworking than on sensible material choices and realistic expectations. A compact desk does not need to be heavy to feel solid, but it does need enough structure to resist racking, wobble, and surface wear.
Solid wood vs plywood vs MDF for a small writing desk
Solid wood offers warmth, repairability, and a classic furniture feel. It is a strong choice for visible legs and aprons, but it can move with humidity, so the top needs to be attached in a way that allows seasonal expansion and contraction.
Plywood is often the most practical desktop material for beginners. A quality plywood panel tends to stay stable, can be painted well, and works especially nicely when edged with solid wood strips for a cleaner profile. MDF is smooth and budget-friendly for painted desks, but it is heavier than many people expect, vulnerable to moisture, and less satisfying if you want a stained wood look.
Best leg styles, joinery options, and weight capacity for everyday writing or laptop use
Straight square legs are the easiest to cut, align, and level. Tapered legs can look more refined, but they add complexity. Metal hairpin legs are fast to install, yet they often create a different visual style and may not feel as rigid as a well-built wood frame if the top is thin.
For joinery, pocket screws, dowels, and mortise-and-tenon joints are all valid options. Pocket screws are especially beginner-friendly for aprons and hidden structural connections. Dowels can produce a cleaner look, while mortise-and-tenon joinery is a traditional high-strength choice for experienced builders.
Exact weight capacity varies by material thickness, leg size, span, and joinery quality, so it is better not to guess at a universal number. A basic small writing desk should comfortably handle everyday writing, a laptop, and light accessories when built with a sound frame, but heavier equipment such as large printers, stacked reference books, or dual-monitor arms may require thicker stock and additional reinforcement.
Essential tools and hardware for a clean, beginner-friendly build
You do not need a full workshop to build a small desk, but you do need accurate measuring and clean cuts. A circular saw with a guide, miter saw, drill/driver, clamps, sander, square, tape measure, and wood glue cover most beginner builds. If you are using pocket-hole joinery, a pocket-hole jig is one of the most useful additions.
Hardware should be chosen to suit the material. Confirm screw length before assembly so fasteners do not punch through the top. If you are attaching a solid wood top, tabletop fasteners or slotted attachment points are worth considering because they help prevent movement-related cracking.
Step-by-Step Build Guide: How to Make a Small Writing Desk from Start to Finish

Desk panels and tools arranged during a small writing desk build.
This method assumes a straightforward four-leg desk with a rectangular top and apron frame. It is the most approachable layout for first-time builders and one of the easiest to adapt to different room sizes.
Step 1: Measure the room and finalise your cut list
Start by measuring the wall width, nearby doors, baseboards, outlets, and the space needed to pull out your chair. Then convert that into a finished desk size. Once the overall dimensions are set, create a cut list for the top, four legs, and aprons.
Include the final thickness of your material in every measurement. A cut list that ignores board thickness is one of the fastest ways to end up with a frame that is too wide or a top overhang that looks uneven.
Step 2: Cut the desktop, aprons, and legs to size
Cut the top first, then the legs, then the aprons. This order helps you keep the most visible piece as clean as possible and lets you adjust apron lengths if your leg stock varies slightly.
Label every part after cutting. Even on a small build, it is easy to confuse front and side aprons or to rotate a leg so the best face ends up hidden. If you are using plywood, apply edge banding or solid wood edging before final sanding if you want a more furniture-like finish.
Step 3: Assemble the frame square and level
Build the base in stages. Join the side aprons to two legs, then join the remaining pair, then connect the front and back aprons. Check for square as you go rather than waiting until the full base is assembled.
Dry-fit the frame on a flat surface before final tightening or clamping. If the floor is uneven, do not assume the desk is twisted; use a known-flat work surface when possible. A square frame is what prevents the finished desk from wobbling and looking slightly off, even if the cuts themselves are accurate.
Step 4: Attach the top securely without restricting wood movement
Place the top upside down on a protected surface and center the frame on it. Confirm the overhang on all sides before attaching anything. If the top is plywood or MDF, direct screw attachment from the aprons can work well when done carefully. If the top is solid wood, use a method that allows movement across the grain.
Do not overtighten screws. The goal is firm attachment, not stress in the panel. If you are unsure about the best fastening method for your chosen material, check the board manufacturer’s guidance and any tabletop fastener specifications before proceeding.
Step 5: Sand, fill, and prepare the surface for finishing
Good finishing starts long before stain or paint goes on. Fill visible holes where appropriate, ease sharp edges lightly with sandpaper, and sand the entire desk progressively rather than jumping straight to a very fine grit.
Remove dust thoroughly between stages. A desk can be structurally excellent and still look amateur if glue squeeze-out, rough end grain, or sanding scratches are left behind. If you plan to paint the desk, primer may improve consistency depending on the material and topcoat you choose.
Step 6: Paint, stain, or oil the desk for the look you want
Paint is often the easiest way to create a crisp, contemporary finish, especially on MDF or mixed-material builds. Stain highlights wood grain but usually demands better surface prep and more even sanding. Hardwax oils and similar penetrating finishes can give a natural, matte look that suits modern and Scandinavian-style rooms.
Always follow the finish manufacturer’s instructions for application, drying, and cure time. A desk may feel dry to the touch before it is ready for daily use, so giving the finish enough time to harden is one of the simplest ways to protect your work.
A four-leg frame with aprons is easier to build accurately than a drawer desk or floating design.
Even minor alignment errors cause wobble, uneven overhangs, and a less polished final look.
Most DIY desks look better when the builder spends more time on sanding and curing than expected.
Design Details That Matter: Materials, Specifications, and Optional Features
Once the basic structure is settled, a few design decisions will shape how the desk feels in daily use. These details often matter more than decorative extras because they affect comfort, durability, and how visually heavy the desk appears in a small room.
Best desktop thickness, edge profiles, and corner treatments for small spaces
A top that is too thin can look temporary and feel less substantial, while one that is too thick may overwhelm a compact room. In general, a moderate top thickness creates the best balance. If you want a lighter visual profile, a subtle eased edge can help the desk look slimmer without sacrificing strength.
Rounded or softened corners are worth considering in narrow walkways, bedrooms, or family spaces where people pass close to the desk. They make the piece feel calmer and slightly less bulky, especially in tight floor plans.
Should you add a drawer, keyboard shelf, or cable management?
Optional features should follow your actual habits, not a generic desk checklist. A shallow center drawer can be useful for pens, chargers, and stationery, but it also reduces knee space and adds build complexity. A keyboard shelf only makes sense if you use a separate keyboard regularly and have enough seated clearance.
Cable management is often the most useful upgrade because it keeps a small desk from looking chaotic. A simple grommet, underside tray, or rear cable clip system can make a compact setup feel far more intentional. If your desk is part of a creative workspace, pairing it with smart storage matters just as much; Hurrell Editions also has a guide on how to organise art supplies in a small space if your desk will share room with drawing or craft materials.
How to balance compact proportions with long-term durability
Compact does not have to mean delicate. The trick is keeping the silhouette light while reinforcing the structure where it counts. A well-sized apron, stable top material, and strong leg joints do more for longevity than decorative trim or extra thickness in the wrong places.
If the desk will be moved often, choose a finish that can be touched up and a build method that tolerates normal knocks. A timeless desk is usually one that avoids trend-heavy details and instead gets the proportions right.
Styling a Small Writing Desk: How It Fits Different Rooms and Interior Looks
A small writing desk often lives in a visible part of the home rather than a dedicated office, so styling matters. The goal is to make it feel integrated with the room while still keeping the surface functional.
Best desk styles for modern, classic, minimalist, and collected interiors
For modern rooms, a desk with square legs, a clean painted finish, or a pale wood top works well. Classic interiors usually suit stained wood, slightly more detail in the apron, or tapered legs. Minimalist spaces benefit from visual restraint, while collected interiors can handle richer tones, vintage-inspired hardware, or a more layered desktop.
How to style the desktop without losing usable workspace
A small desk should never be styled so heavily that it stops functioning as a desk. One lamp, one tray, and one personal object is often enough. If you need inspiration for keeping a creative setup tidy, see Hurrell Editions’ guide on how to organize a desk for an artist, which translates well to compact writing desks too.
Vertical styling can help preserve surface area. A small picture ledge above the desk, a pinboard, or a narrow shelf keeps the desktop clearer while still adding personality. If that appeals, the site also covers how to build a picture ledge for a coordinated wall feature nearby.
Pairing the desk with the right chair, lamp, storage, and wall decor
Choose a chair that tucks in neatly and does not visually overpower the desk. In small rooms, open-frame chairs, armless styles, or compact upholstered seats often work better than bulky task chairs, unless the desk is for long work sessions.
Lighting should be task-friendly but scaled to the desk. Storage can be as simple as a drawer unit beside the desk or baskets below a nearby shelf. Wall decor should support the work area without crowding it. A framed print, small pinboard, or soft picture lighting can help the desk feel intentional rather than improvised.
Benefits, Limitations, and Common Mistakes to Avoid
A small writing desk is highly useful, but it is not a universal solution. Understanding what it does well helps you build the right version and avoid disappointment later.
Why a small writing desk works so well in compact homes
It uses less floor space, looks lighter than a full office desk, and can blend into multipurpose rooms more gracefully. This makes it especially useful in apartments, guest rooms, bedrooms, and open-plan living spaces where furniture has to work hard without dominating the room.
It is also easier to customize. A few inches of width or depth can make a major difference in a small room, and building your own lets you tailor those dimensions exactly.
Where small desks fall short for heavy equipment or all-day office setups
Small writing desks are not always ideal for dual monitors, large desktop towers, deep keyboard trays, or heavy storage loads. They can also feel limiting for people who spread out paperwork, use drafting tools, or spend a full workday at the desk and need more ergonomic adjustability.
In those cases, a larger desk or a purpose-built office workstation may be a better investment. Compact desks are strongest when the work itself is compact.
Common DIY errors, from poor measurements to weak joints and uneven finishes
The most common errors are building too deep for the room, forgetting chair clearance, using weak joinery, rushing the sanding, and choosing materials that do not suit the finish. Another frequent issue is adding a drawer too early and compromising legroom.
- Measure the room and chair clearance before setting the cut list.
- Use a simple apron frame for stiffness and easier alignment.
- Test your finish on offcuts when possible.
- Keep accessories light if the desk is meant for a small room.
- Building a desk deeper than the room can comfortably handle.
- Assuming all boards are perfectly straight or identical in thickness.
- Rigidly screwing down a solid wood top without allowing movement.
- Judging the finish before it has fully cured.
Care, Maintenance, and Long-Term Value
A handmade desk tends to age well when the finish suits the material and daily habits are sensible. Maintenance is usually simple, but it matters more on compact desks because the surface gets used intensively.
How to protect painted, stained, oiled, and lacquered desk surfaces
Painted surfaces benefit from gentle cleaning and protection from repeated abrasion in the same spot. Stained and lacquered tops usually need protection from moisture rings, heat, and sharp objects. Oiled finishes may need more regular refreshing depending on the product used and how heavily the desk is used.
Always follow the finish manufacturer’s care guidance, especially for cure time, cleaners, and recoat intervals. Strong cleaners, standing water, and direct heat can shorten the life of many desk finishes.
Simple maintenance habits that keep a handmade desk looking refined
Use a desk pad if you write heavily in one area, lift objects instead of dragging them, and wipe spills quickly. Felt pads under lamps, trays, and organizers can prevent subtle scratching that makes a small desk look worn faster than a larger one.
If the desk sits near a sunny window, monitor fading and heat exposure. Humidity swings can also affect solid wood over time, so a stable indoor environment helps preserve fit and finish.
Cost breakdown, value for money, and whether building your own is worth it
Cost varies widely by lumber choice, sheet goods, hardware, and finish, so it is best to price your exact material list locally before buying. In general, a simple build offers the best value when you keep the structure straightforward and spend selectively on the most visible surfaces.
Building your own is usually worth it when you need custom sizing, want better proportions than many budget desks offer, or care about matching the piece to the room. It is less compelling if you need advanced office features or do not have access to the basic tools required for accurate cuts and assembly.
Final Recommendation: The Most Practical Small Writing Desk Build for Style, Function, and Budget
For most readers, the most practical small writing desk is a 42- to 48-inch-wide frame-and-top build with four straight legs, a stable top material, and a durable low-sheen finish. That combination fits a wide range of home office layouts, feels visually calm, and keeps the project manageable for beginners.
Who should build this type of desk and who should consider alternatives
This build suits renters, homeowners, students, creatives, and anyone furnishing a compact office corner who wants a cleaner fit than many ready-made desks provide. It is especially useful when room dimensions are awkward or when the desk needs to coordinate with existing furniture and decor.
If you need integrated filing, heavy-equipment support, or a desk for all-day professional workstation use, consider a larger or more specialized design instead. Simplicity is the strength here, but it is also the limit.
The best balance of size, material, and finish for a timeless home office piece
The most balanced version is usually a modest-depth desk with a plywood or solid wood top, solid legs and aprons, and a finish chosen for the room rather than trend appeal. Painted builds feel crisp and versatile; natural wood or lightly stained finishes feel warmer and more furniture-like.
If you want one clear takeaway, it is this: build the smallest desk that still supports your real workflow, and put your effort into stability, proportion, and finish quality. That is what makes a compact writing desk feel intentional and lasting rather than simply small.
Frequently Asked Questions

5 Comments