How to Hang a Picture Ledge
Hang a picture ledge by choosing the right wall, marking a level position, and using fixings suited to the wall type and weight. Then style it with a few framed pieces, books, or objects so it feels curated rather than crowded.
A picture ledge is one of the easiest ways to create a layered, flexible display at home. Done well, it can make a wall feel curated rather than crowded, with room for framed art, books, and small objects to change over time.
- Wall first: Match the ledge and fixings to your wall type.
- Placement matters: Use height, light, and furniture to guide position.
- Plan before drilling: Decide on scale, depth, and style in advance.
- Secure installation: Level carefully and confirm load support.
- Style lightly: A few well-chosen pieces usually look best.
How to Hang a Picture Ledge for a Curated, Gallery-Style Display
If you are learning how to hang a picture ledge, the goal is not just secure installation. It is also to place it in a way that supports the mood of the room, the scale of your artwork, and the kind of display you want to live with long term.
What a picture ledge does for art, books, and objects
A picture ledge gives you a shallow stage for leaning framed prints, photographs, and small works without committing to a rigid wall arrangement. It is especially useful for people who like to rotate pieces, layer them casually, or mix art with books and collected objects.
Unlike a fixed gallery wall, a ledge lets the display evolve. That makes it ideal for homes where the collection is still growing, or where you want the freedom to refresh a room seasonally without patching lots of nail holes.
Why this guide matters for design-minded homes in 2026
In 2026, interiors are still leaning toward warmth, personality, and flexibility. Picture ledges suit that shift beautifully because they support a lived-in, editorial look rather than a stiff, over-planned one.
For art lovers, book lovers, and gift-givers, the appeal is practical as well as aesthetic. A well-hung ledge can hold meaningful pieces at eye level, keep surfaces less cluttered, and make a small collection feel considered.
Choose the Right Wall, Height, and Room Context
Before you drill, think about where the ledge will live and how it should feel in the room. The best placement depends on traffic flow, furniture height, natural light, and whether the ledge is meant to be noticed immediately or read as a softer background layer.
Best placements for living rooms, hallways, bedrooms, and reading corners
Living rooms usually benefit from a picture ledge above a sofa, sideboard, or console table, where it can anchor the seating area without competing with larger furniture. Hallways are excellent for slimmer ledges, especially when you want visual interest in a narrow space.
Bedrooms often suit a calmer arrangement, perhaps above a headboard or dresser, with fewer pieces and more breathing room. Reading corners are a lovely place for a ledge that mixes framed art with a few favourite books and one or two tactile objects.
Eye-level rules for art versus lower placement for layered styling
As a general guide, art on a ledge should still sit comfortably within the viewer’s line of sight. If the ledge is too high, smaller pieces can feel disconnected; too low, and the arrangement may seem heavy or awkward.
For a more layered, collected look, some designers place ledges slightly lower than a traditional picture rail would sit. That works especially well when the ledge is meant to interact with furniture, such as a console or bench, rather than float alone on a blank wall.
Considering light, sightlines, and nearby furniture
Natural light can be beautiful, but strong direct sun can fade prints, photographs, and works on paper over time. It is wise to avoid placing delicate art where afternoon light hits hard for long periods.
Also consider sightlines from doorways and seating areas. A ledge should feel balanced from the main approach to the room, not only from straight on. If it sits above furniture, leave enough visual space so the wall does not feel cramped.
If you are choosing a ledge specifically for framed art, depth matters more than many people expect. A slightly deeper ledge can offer more stability for layered frames and small objects, which is why it is worth comparing options before buying.
Plan the Look Before You Drill
Good installation starts with a clear visual plan. Before any tools come out, decide what the ledge will hold most often and whether the arrangement should feel minimal, eclectic, or book-led.
Artwork scale, frame depth, and ledge depth considerations
Measure the height and depth of the frames you want to use. Oversized frames need more room to lean safely, while very small frames can disappear if the ledge is too deep or the wall too large.
If you want a more detailed guide on proportions, Hurrell Editions also covers how deep a picture ledge should be for framed art. That question matters because the wrong depth can limit what you can display comfortably.
Style trade-offs: minimal, eclectic, salon-inspired, or book-led displays
A minimal ledge usually relies on a few larger pieces with generous spacing. It feels calm and modern, and it works well in rooms that already have strong furniture or texture.
An eclectic ledge can hold a mix of prints, snapshots, small objects, and books. Salon-inspired styling is more layered and expressive, while book-led displays suit spaces where the ledge is as much about reading material as it is about art.
- Rotating framed prints
- Layered styling with books
- Small sculptural objects
- You want a very flat, uniform display
- You prefer a strict grid
- Your wall cannot support secure fixing
Curator recommendations for mixing prints, photographs, small sculptures, and objects
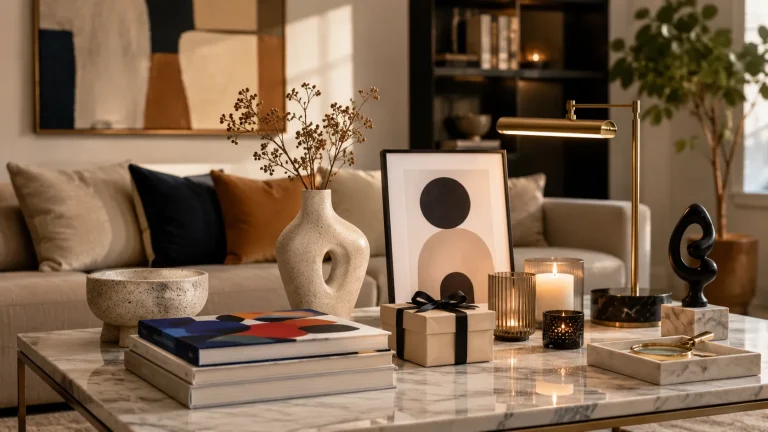
The most successful ledges usually combine visual variety with restraint. A few framed pieces, one book stack, and one sculptural object often feel more refined than filling every inch of space.
If you want more help avoiding visual clutter, read how to arrange frames on a picture ledge without clutter. For broader styling ideas, how to style picture ledges for layered art display is a useful companion piece.
A small framed black-and-white photograph paired with a linen-bound art book and a ceramic vessel can create a quietly luxurious ledge. The combination feels collected, not staged, and works especially well in rooms with warm neutral walls.
Tools, Fixings, and Materials That Suit Your Wall
The right hardware depends on the wall type, the ledge weight, and what you plan to place on it. This is one area where it is worth being practical rather than optimistic.
Studs, anchors, screws, and levels for secure installation
If possible, fix into wall studs for the most secure support. When studs are not available, use anchors designed for the wall material and the expected load, and always follow the manufacturer’s guidance.
You will also want a tape measure, pencil, level, drill, appropriate drill bits, and the screws supplied with the ledge or recommended by the maker. A spirit level is especially important if the ledge will hold framed pieces that should sit straight.
What changes for plaster, drywall, brick, or concrete walls
Drywall is usually the easiest to work with, though it still needs the right anchors. Plaster walls can be more fragile and may require extra care to avoid cracking, while brick and concrete need masonry fixings and the correct drill bit.
If you are unsure about your wall type, check before you begin. A beautiful ledge is only beautiful if it stays put, and the fixing method should match the wall rather than the other way around.
Price context: budget-friendly hardware versus premium installation choices
Hardware costs vary widely depending on the wall and the quality of the components. Entry-level fixings are often suitable for lighter displays, while mid-range and premium options may offer better stability, finish, or compatibility with difficult surfaces.
For a simple home project, budget-friendly tools may be enough. For heavier ledges, valuable artwork, or challenging wall conditions, it can be worth investing in stronger anchors or professional installation support.
Step-by-Step: How to Hang a Picture Ledge Safely and Neatly
Once the placement and hardware are decided, installation becomes a careful sequence rather than a guess. Take your time here; neat alignment makes the finished ledge look intentional and polished.
Hold the ledge against the wall and mark the top or fixing points lightly with a pencil. Use a level to check that your marks are straight before drilling.
Double-check spacing, distance from furniture, and the ledge’s relationship to nearby artwork or switches. Small errors are easier to correct now than after holes are made.
Drill carefully, insert the correct anchors if needed, and fasten the ledge with screws that suit both the wall and the ledge construction. Tighten firmly, but do not overdrive the screws.
Give the ledge a gentle test once mounted. It should feel secure, level, and ready for the weight you plan to place on it.
Marking, measuring, and checking alignment
Alignment matters more than people expect, especially in rooms with strong architectural lines. A ledge that is even slightly off-level will make every frame on it look wrong, no matter how beautiful the pieces are.
Use painter’s tape if you want to map the ledge position on the wall before drilling. This can help you picture how it will relate to furniture and art around it.
Drilling, fastening, and confirming load support
Drill slowly and cleanly, especially in plaster or masonry. Once the ledge is fixed, check that it does not wobble and that the screws feel secure in the wall.
Remember that load support is not just about the ledge itself. The combined weight of frames, books, and objects can become significant, especially when pieces are leaned in layers.
Final adjustments for straightness and visual balance
After installation, step back and look from several angles. Adjust the arrangement so the tallest pieces do not all sit in one place, and leave enough space for the eye to move across the ledge naturally.
If the wall is long, you can create rhythm by varying frame heights and materials. If the wall is short, keep the composition simpler so it feels calm rather than crowded.
Style the Ledge Like a Mini Exhibition
Once the ledge is secure, the fun begins. Styling is where a practical shelf becomes a living display with character, texture, and emotional warmth.
Layering framed art with books, ceramics, and collected objects
Start with one or two anchor pieces, usually the largest frames, and layer smaller frames in front or beside them. Then add a book stack or a small ceramic object to break up the flatness of the arrangement.
Different heights and materials help the display feel collected over time. A matte frame next to glazed ceramic, or a monochrome print beside a linen-covered book, creates contrast without noise.
Think of the ledge as a tiny exhibition that changes with your mood: a spring print, a favourite novel, a postcard from a meaningful trip, or a small object picked up on a quiet weekend.
Using lighting to enhance mood and highlight texture
Soft lighting can make a ledge feel intimate and gallery-like. A nearby lamp, picture light, or wall sconce can bring out paper texture, frame grain, and the subtle shadows created by layered objects.
If you are considering lighting, Hurrell Editions has a helpful guide on how to choose a picture light for artwork. The right light can change the whole mood of a display.
Seasonal refresh ideas for creative living spaces and gifting moments
Picture ledges are ideal for seasonal updates because the changes do not require a full redesign. Swap in brighter prints for spring, deeper tones for winter, or a special gift piece when celebrating a birthday or housewarming.
For gift-givers, this is a lovely way to present art books, framed photographs, or a small collectible object. The ledge becomes a place where thoughtful gifts are not only stored, but genuinely enjoyed.
Care, Safety, and Long-Term Display Tips
A well-hung ledge should be easy to live with. A little upkeep keeps it safe, tidy, and visually fresh.
Preventing slips, wall marks, and overcrowding
Make sure frames lean securely and are not placed so close together that they push each other forward. If needed, use discreet bumpers or felt pads to reduce slipping and protect both the wall and the frame edges.
Overcrowding is the most common styling mistake. Leaving some negative space helps each object read clearly and keeps the ledge from feeling heavy.
Works on paper, photographs, and textile-based pieces can be sensitive to sunlight, humidity, and dust. Keep them away from damp walls, direct heat sources, and strong sun whenever possible.
Cleaning ledges, frames, and objects without disturbing the arrangement
Dust the ledge gently with a dry or slightly damp cloth, depending on the finish. Remove objects one at a time when cleaning frames or ceramics so the arrangement does not shift unexpectedly.
If you display books on the ledge, check them occasionally for dust along the top edge and avoid placing them in areas where condensation or moisture may build up.
When to update the display for new art, books, or gifts
Refresh the ledge whenever the room’s mood changes, when new work arrives, or when a gift deserves a place of its own. You do not need a special occasion; the point of a ledge is that it can evolve naturally.
If you enjoy changing displays often, it may help to keep a small rotating group of pieces nearby so you can swap them in and out without starting from scratch.
Creative Recap: A Picture Ledge as a Living Gallery at Home
A picture ledge is more than a practical shelf. It is a flexible design tool that lets a home feel edited, personal, and alive with changing interests.
Why a well-hung ledge elevates interiors with flexibility and personality
When a ledge is hung securely and placed thoughtfully, it can soften a room, add depth to a wall, and showcase art in a way that feels relaxed rather than overworked. It also gives you room to grow, which is valuable if your collection is still evolving.
For more perspective on display formats, you may also find picture ledge shelves vs hanging individual frames useful when deciding whether a ledge suits your space better than a traditional arrangement.
Final inspiration for building a display that evolves with your collection
If you are deciding how to hang a picture ledge, think beyond the drill holes. Choose a height and wall that support the room, use the right fixings for the surface, and style it with a collector’s eye but a generous spirit.
The best ledges are not static. They change with the seasons, the books you are reading, the prints you love, and the gifts you want to keep close.
Recommended Products
SHOP THIS SETUP
Picture Ledge Shelf 48 Inch by Sorbus
This Sorbus picture ledge is a strong pick for anyone following a picture-ledge hanging guide because it offers a clean, versatile way to display framed art, books, and decor without a bulky shelf profile. The longer 48-inch size gives you more styling flexibility, and the simple wall-mounted design makes it easy to level and install for a polished gallery look.
Frequently Asked Questions
A good height depends on the room and nearby furniture, but most ledges look best when they sit comfortably within the viewer’s line of sight. Above sofas, consoles, or beds, keep the ledge balanced with the furniture below it.
Yes, if the ledge and fixings are rated for the weight and are installed correctly. For heavier frames or layered displays, fix into studs when possible or use anchors suited to your wall type.
Studs are the most secure option, especially for heavier ledges or more substantial displays. If studs are not available, use the correct anchors for drywall, plaster, brick, or concrete.
Picture ledges can hold books, small sculptures, ceramics, postcards, and other decorative objects. The key is to keep the arrangement stable and avoid overcrowding.
The ideal depth depends on the thickness of your frames and whether you want to layer pieces. A slightly deeper ledge is often more versatile, especially for varied displays.
Use a level installation, stable leaning angles, and optional frame bumpers or felt pads if needed. Avoid overloading the ledge so the pieces can rest securely without crowding each other.